Adding and Authenticating a Sending Domain
- DarkLight
Adding and Authenticating a Sending Domain
- DarkLight
Article summary
Did you find this summary helpful?
Thank you for your feedback
Goals and Outcomes
A sending domain is the domain used in the "From" field of your emails. A dedicated and authenticated sending domain adds security and credibility to the emails you send to customers. Inbox service providers (ISPs) like Google and Yahoo require domain authentication to verify that emails are coming from you. Adding a sending domain can increase your deliverability rates and will remove via yotpomail.com from the "From" field.
In this article, you’ll learn how to add and authenticate your sending domain.
Sending Domain Authentication Overview
An authenticated sending domain shows ISPs that Yotpo has permission to send emails on your behalf. As per requirements from the major ISPs, if you ever send 5,000 emails or more a day, you must authenticate your domain. Explicitly stating that an email comes from you improves your reputation, and makes it less likely that the provider will filter your messages. This means there's more chance your emails will get into your recipient’s inbox and less chance they'll be marked as spam. To learn more, see Yotpo Email Deliverability Guide.
What do my emails look like with and without a sending domain?.png "image(249).png")
Email sending domain authentication involves configuring the SPF, DKIM, and DMARC protocols. These protocols prevent unauthorized use and improve email deliverability.
Accessing the Sending Domain Authentication Setup
To start the authentication process, from the Yotpo SMS & Email menu, go to Settings > General Settings and scroll down to the Email Settings tab. Under Dedicated sending domain, click Get started..png "image(252).png")
Adding and Authenticating a Sending Domain
The sending domain authentication setup has 2 steps before deciding between the automatic and manual processes:
Automatic Domain Authentication Process Coming Soon
Manual Domain Authentication Process
Tip
Before you begin, make sure you know who your DNS provider is and have your credentials ready, as you’ll need to log into the DNS provider’s portal. Your DNS provider is usually the company where you purchased your domain. However, if you’re unsure, you can use a DNS checker like the ICANN lookup tool to find your provider.
Step 1: Adding a domain
You can send emails from your root domain or a subdomain, depending on your authentication setup. Root domains are the primary domains used for sending emails (@mystore.com), while subdomains are extensions of the root domain, often used to segment marketing campaigns or different services (for example, @orders.mystore.com). Yotpo Email supports authentication for either option, giving you the flexibility to choose the best fit for your business.
Root Domain Authentication
Authenticating your Yotpo account with your root domain allows you to send emails from a Sender Email Address, such as marketing@mystore.com. This setup is likely similar to what you’ve done with other email service providers before migrating to Yotpo. While commonly used, it carries some risk to your domain’s reputation. If your root domain is flagged or blocklisted due to email activity that doesn’t follow best practices, it could affect your website accessibility and other critical business systems tied to that domain.
Note
You can use a root domain that has already been authenticated with another email service provider (ESP). However, we strongly recommend using a subdomain instead of a root domain to enhance flexibility, isolate your marketing activity, and safeguard your root domain’s reputation.
You can see below how an authenticated root domain appears when viewing email headers in an email client. Since header details are usually hidden by default, most recipients will only see the Sender Email Address. If they expand the header, the signed-by field will display your authenticated root domain.

Subdomain Authentication
Authenticating your Yotpo account with a subdomain allows you to send emails using a Sender Email Address, such as marketing@hello.mystore.com. The key benefit is that your subdomain builds its own sending reputation, independent of the root domain. Before setting up your subdomain with Yotpo, ensure it hasn’t been previously used with another ESP. The subdomain option enables you to fully separate your email marketing activities, creating a distinct mail stream.
With the subdomain setup, your Sender Email Address doesn’t require verification, and you can use a different Reply-to Email Address to receive responses. If you wish to receive replies at the Sender Email Address, you will need to set up an inbox with your mailbox provider.
Important
As a best practice, it is strongly advised that you are able to receive replies at the Sender Email Address, which is something your IT team should be able to assist with.
Below is an example of how an authenticated subdomain appears in email headers. While header details are usually hidden by default, if recipients expand the header, the signed-by field will display the subdomain you’ve chosen to authenticate with.
.png "image(318).png")
Important
We strongly recommend using a subdomain instead of a root domain for your email sending. Here’s a summary of the main benefits:
Dedicated sending reputation: A subdomain builds its own reputation, keeping your root domain unaffected by email performance issues
Enhanced security: Isolating email marketing on a subdomain reduces the risk of your root domain being flagged or blocklisted
Flexibility: Using a subdomain allows you to segment marketing activity without impacting other business-critical operations tied to your root domain
After deciding whether to use a root domain or a subdomain, you can complete the first step of the authentication setup.
To authenticate a root domain:
Enter your root domain, for example, mystore.com.
Unmark the Add subdomain checkbox.
Click Next.
Your sending domain will be @mystore.com.
To authenticate a subdomain:
Enter your root domain, for example, mystore.com.
Add a subdomain in the field below the Add subdomain checkbox, for example, hello. It will be automatically added to your root domain.
Tip
You can choose any word for your subdomain, but it must be used exclusively for Yotpo Email and not for any other external ESPs. If you add a subdomain, you won’t be able to send emails from your root domain.
.png "image(319).png")
Click Next.
Your sending domain will be @hello.mystore.com.
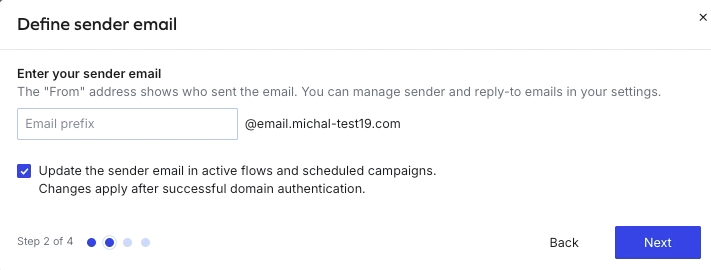
Step 2: Configuring your Sender Email Address
When the next step appears, enter the email prefix in the text box. This becomes your Sender Email Address, the one your recipients will see in their inbox when they get your emails. Since you’re authenticating this address, it becomes your default for sending. Keep in mind, you’ll only be able to send emails from authenticated addresses.
Yotpo automatically updates your sender email in any active flows or scheduled campaigns by default, so you don’t need to do anything. This helps your emails land in inboxes, not spam folders. When you’re ready, just click Next to continue.
Note
After authenticating your domain, you can easily add more sender email addresses directly from the Email Settings page. These additional addresses don’t require separate authentication, but they must match your authenticated domain to be used for sending campaigns and flows. Keeping your sender addresses aligned with your domain helps maintain your sender reputation and improves email deliverability.
Make sure your email address matches the domain you’re authenticating. If you’d rather use a different domain, you’ll need to restart the process and authenticate that domain instead.
Yotpo will only replace your sender email in flows and scheduled campaigns after you complete the domain authentication. If you exit the process early, nothing will change. But once you finish, we’ll handle the replacement automatically, no extra steps on your end.
At this stage, if you're eligible, you’ll see the option to use our automatic domain authentication process. If not, no worries, you can continue with the manual steps instead.
Automatic Domain Authentication Coming Soon
Manual Domain Authentication Process
Updating your DNS Records
In this step, you’ll have to update your DNS (Domain Name System) records. There are different types of DNS records. By following the instructions below, you will verify your CNAME records to ensure your domain and subdomain are properly authenticated for email delivery and recognized as legitimate by ISPs.
The verification process will require you to log into your DNS portal while keeping the Yotpo Email app open. Please be aware that some of the instructions below are general, as each DNS provider has a different interface and field names may vary. If you do not typically manage your DNS settings, you may need to consult with your IT team or system administrator.
Important
When you verify your CNAME records, the authentication for the SPF (Sender Policy Framework) and DKIM (DomainKeys Identified Mail) protocols is also completed. SPF identifies the mail servers allowed to send emails from your domain, while DKIM uses digital signatures to verify that your messages are genuine and have not been altered.
.png "image(255).png")
To update your DNS records:
Open a new browser tab or window and log into your DNS provider’s portal.
In the DNS settings, create a new CNAME record.
In the Yotpo Email app, in the first row, click Copy to copy the entry from the Host column and paste it into the Host field in the DNS provider’s portal.
.png "image(256).png")
In the Yotpo Email app, in the first row, click Copy to copy the entry from the Value column and paste it into the Value field in the DNS provider’s portal.
.png "image(257).png")
Save the record and repeat the steps above for the remaining records.
.gif)
After saving the records, wait for several minutes for the changes to be processed. Next, in the Yotpo Email app, click Verify records and the system will notify you that the verification is successful.
Tip
Some domain registration services may not permit you to directly modify your DNS records. If this is the case, you should get in touch with your DNS provider for guidance on how to update them. Here are the guides for updating DNS records of the most popular providers:
Setting up a DMARC record
To complete the domain authentication process, you must set up an authentication protocol called DMARC (Domain-based Message Authentication, Reporting & Conformance). Establishing a DMARC record protects your brand and audience against phishing and spoofing threats. The aim is to ensure that only valid emails from your domain enter inboxes, thereby enhancing your sender reputation and delivery rates.
Major ISPs require authenticated domains to have a valid DMARC record. If you already have one, the system will check it once you reach this step. If the check is successful, you don’t need to take any further action. Simply click Done.
.gif "2024-10-16_12-26-34 (1).gif")
If you don’t have DMARC set up, you’ll need to go to your DNS provider’s portal and create one.
.png "image(260).png")
To add a DMARC record:
In your DNS provider’s portal, go to the DNS settings and create a new TXT record.
In the Yotpo Email app, click Copy to copy the entry from the Host column and paste it into the Host field in the DNS provider’s portal.
Important
Some domain hosts automatically add your domain name after _dmarc. If not, you need to add it yourself, for example, _dmarc.yourbrand.com.
In the Yotpo Email app, click Copy to copy the entry from the Value column and paste it into the Value field in the DNS provider’s portal.
Important
The minimum required DMARC policy is v=DMARC1; p=none; sp=none. The possible policy options include:
p=none: This policy does not affect the delivery of emails. It collects data about email authentication without enforcing any actions on unauthenticated emails.
p=quarantine: This policy suggests that emails failing DMARC checks should be treated as suspicious and placed in the spam or junk folder
p=reject: This policy instructs receiving servers to reject any emails that fail DMARC checks, preventing them from being delivered to the recipient
If you choose a more restrictive setting (like p=quarantine or p=reject), you should avoid reverting to a less restrictive policy. Doing so can lead to unintended delivery issues for legitimate emails that may not pass DMARC checks, potentially harming your email deliverability.
Save the record.
After saving the record, wait for several minutes for the changes to be processed. Next, in the Yotpo Email app, click Verify records and the system will notify you if the verification is successful. Click Done to exit the setup process.
If the verification is not successful, the possible errors may include:
DMARC record is not valid
In this case, you need to go back to the DNS provider’s portal, delete the existing DMARC record, and create a new one from scratch following the steps above.More than one DMARC record is found
You can have only one DMARC record per domain in your DNS portal. Having more than one can cause conflicts and lead to improper email authentication handling. Go back to the DNS provider’s portal and delete any additional records you created starting from the most recent.No DMARC record is found
This happens when no DMARC record is saved or added in your DNS provider’s portal. Go back to the portal and add the record again.
Technical issues
In case of technical issues, try creating the DMARC record again. If unsuccessful again, wait for a few minutes and try again.
If you have any questions, don't hesitate to reach out to our Support team.
Tip
You can set up DMARC authentication for your sending domain in your DNS provider yourself, but we highly recommend consulting with an email deliverability expert or using an online tool to make sure it was done correctly. A few third-party tools that can help manage DMARC implementation and DMARC reports are:
Once you’ve successfully completed the setup, the sending domain will appear in a table under the Dedicated sending domain section with a label indicating that authentication is still in progress. Note that this process may take up to 48 hours.
.png "image(259).png")
After you have authenticated your sending domain, it’s important to use an authenticated email address when sending campaigns and flows. This will increase the chances that your emails will reach the inbox rather than the spam folder.
To add the authenticated email address, in the Yotpo SMS & Email mani menu, go to Settings > General Settings > Email Settings tab > Sender and reply-to email addresses section. For more details, see Adding and Verifying Store Emails.
Next Steps
After adding an authenticated email address, it's necessary to warm up the infrastructure. The warm-up process requires sending fewer emails right after adding the new domain, and gradually increasing the volume over time. To learn more, see Warming Your New Domain Infrastructure.
Was this article helpful?