- DarkLight
Adding Products to Your Email and Using Click-to-Redeem and Click-to-Buy
- DarkLight
Goals and Outcomes
Enhance your email campaigns by adding products directly to your emails, giving customers a quick path to browse and purchase. Encourage customer engagement with the Click-to-redeem feature, a single click takes loyalty members straight to checkout with their points automatically applied.
In this article, you’ll learn how to display products in your emails and set up Click-to-Redeem and Click-to-Buy to streamline the customer journey.
Product Block Overview
Initial View
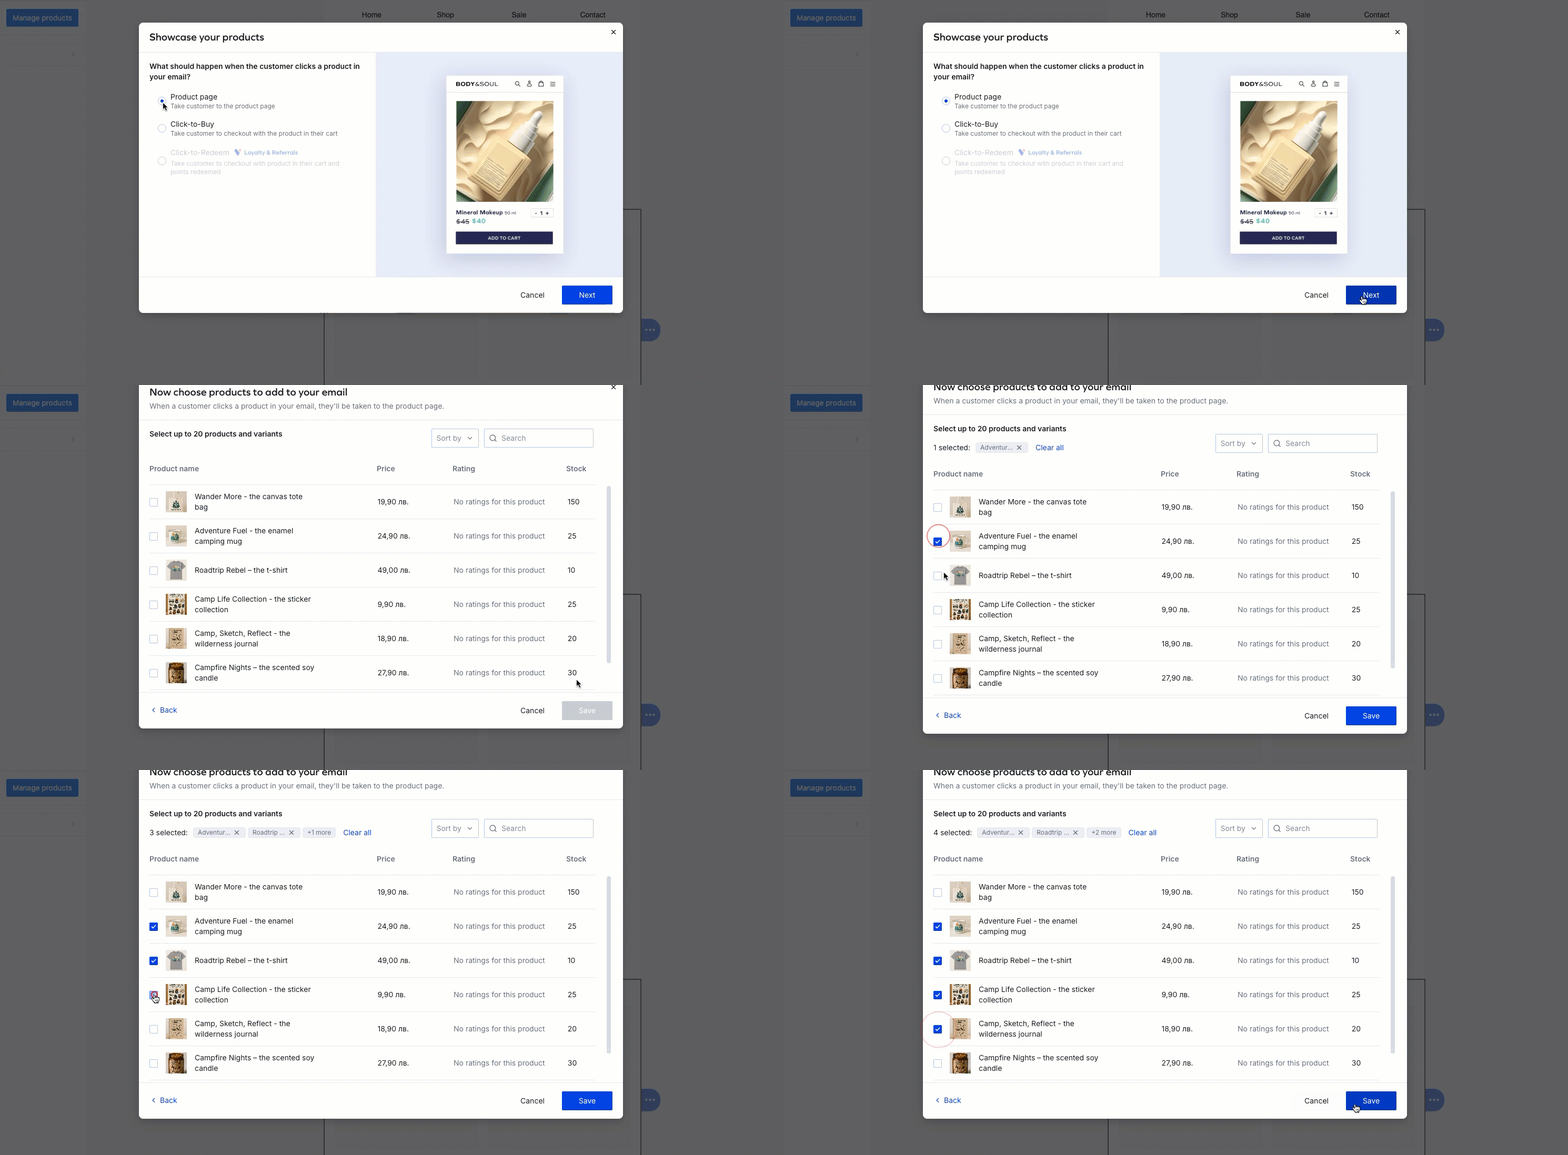
You can add products directly to your email so customers can click and go to the product page:
From the Yotpo SMS & Email dashboard, go to Campaigns.
Select an existing campaign and click Edit, or click Create Campaign to start a new one.
On the email preview screen on the right-hand side, click Edit to open the Email Content Editor.
Click on the Content tab and expand the Blocks section.
Click and drag the Products block into your layout.
.gif)
Select the Product page and click Next.
Choose products to add to your email from your Shopify catalog. When a customer clicks a product in your email, they'll be taken to the selected product's page.
Click Save.
Note
Product prices, images, and sale labels update automatically when the email campaign or flow is sent, so your customers always see the latest information from your Shopify store even if you made changes after creating the email template.

Click-to-Buy Overview
Initial View
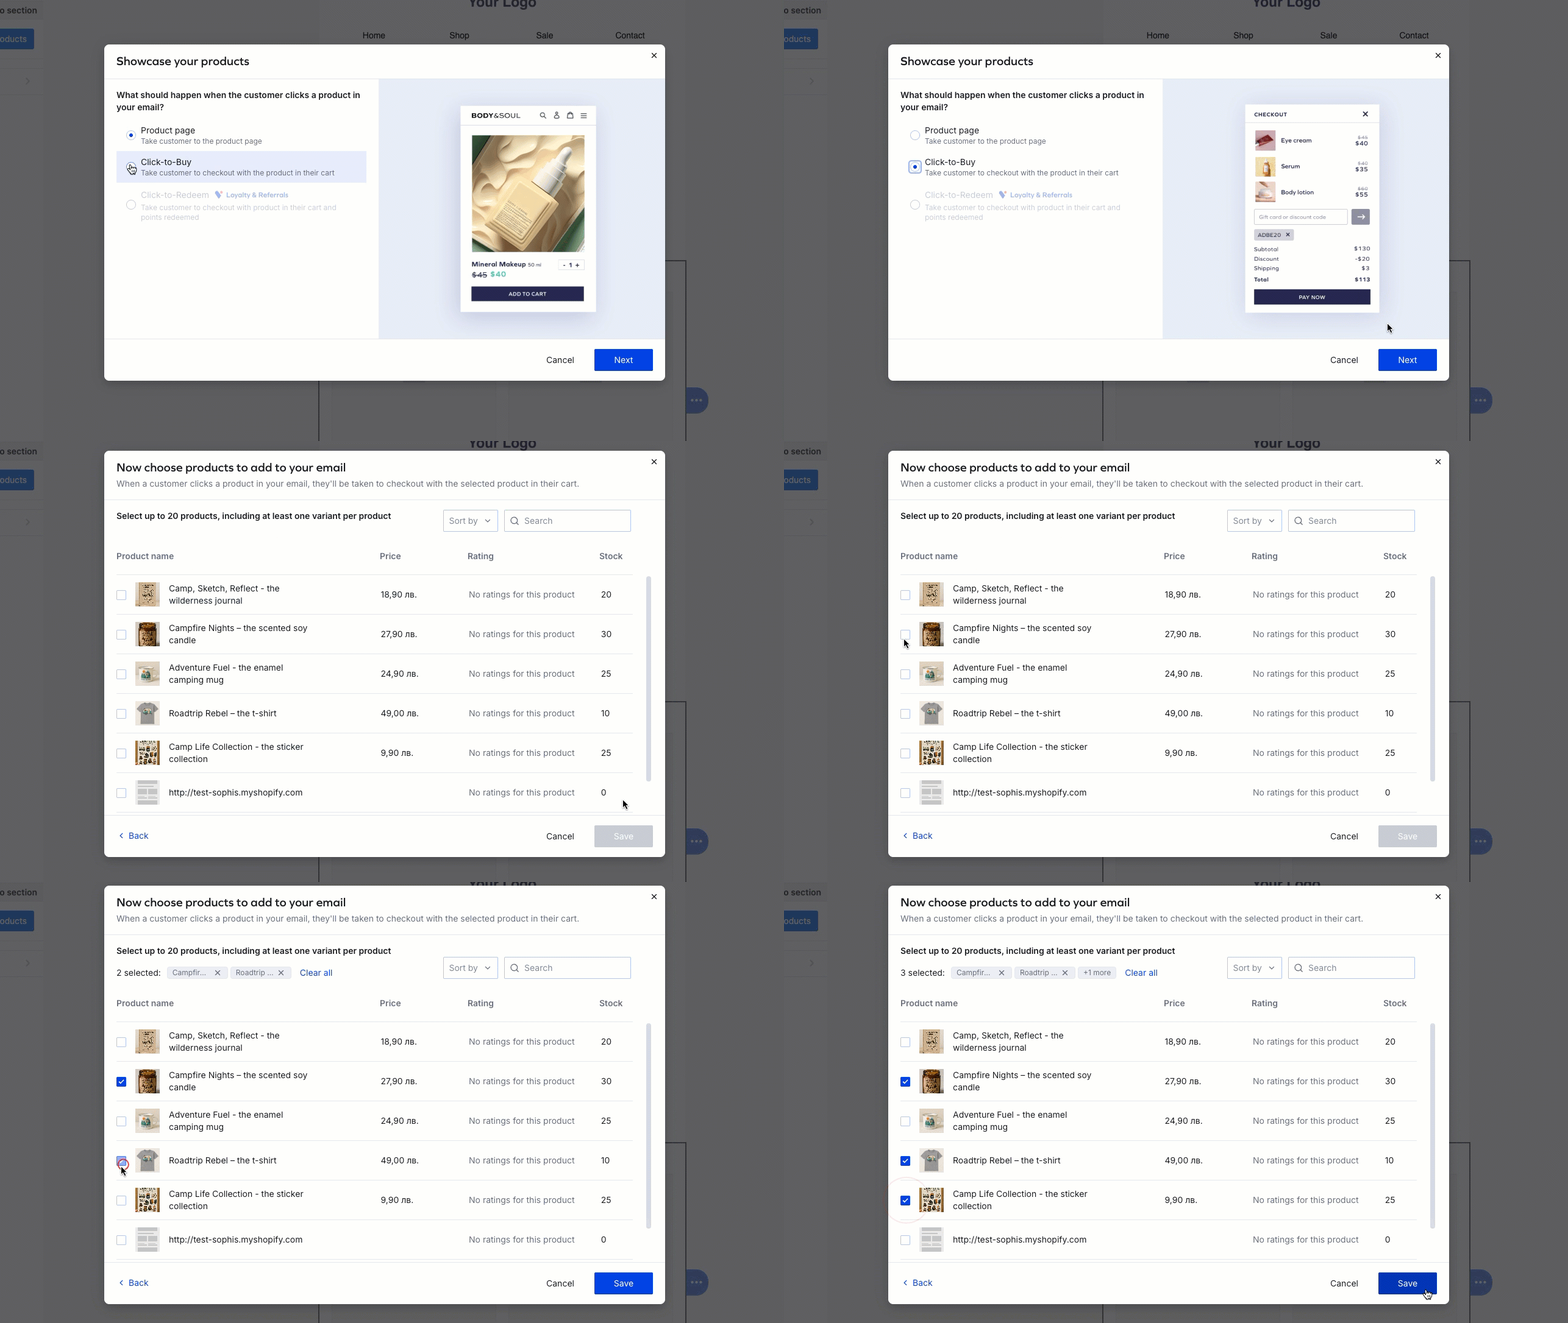
Click-to-buy takes customers straight to checkout with the featured product already in their cart. Just add a Products block to your email and select the products you want to showcase. It streamlines the buying process, making it easier for customers to complete their purchase and boosting conversion rates.
Adding Click-to-Buy Products to Your Campaign
Add the Products block to your layout as shown above.
Select Click-to-buy, and click Next.
Choose products from your Shopify catalog to add to your email. When customers click a product, they’ll be taken directly to checkout with the selected item already in their cart.
Click Save.

Click-to-Redeem Overview
Initial View
Click-to-Redeem makes it easy for loyalty members to complete a purchase. Similar to Click-to-buy, when a customer clicks a product in your email, they’re taken straight to checkout with the item in their cart, but with Click-to-redeem, their eligible loyalty points are automatically applied.
There’s no need for customers to enter promo codes. The process is seamless, fast, and designed to boost conversions.
Who is the target audience?
The campaign is sent to loyalty program members who are eligible to redeem points and are subscribed to your emails. A dedicated segment is automatically created to target just those customers.
Before You Start
To send a Click-to-redeem campaign, make sure you have an active Yotpo Loyalty & Referrals account with a Rewards program enabled.
Adding Click-to-Redeem Products to Your Campaign
Add the Products block to your layout as shown above.
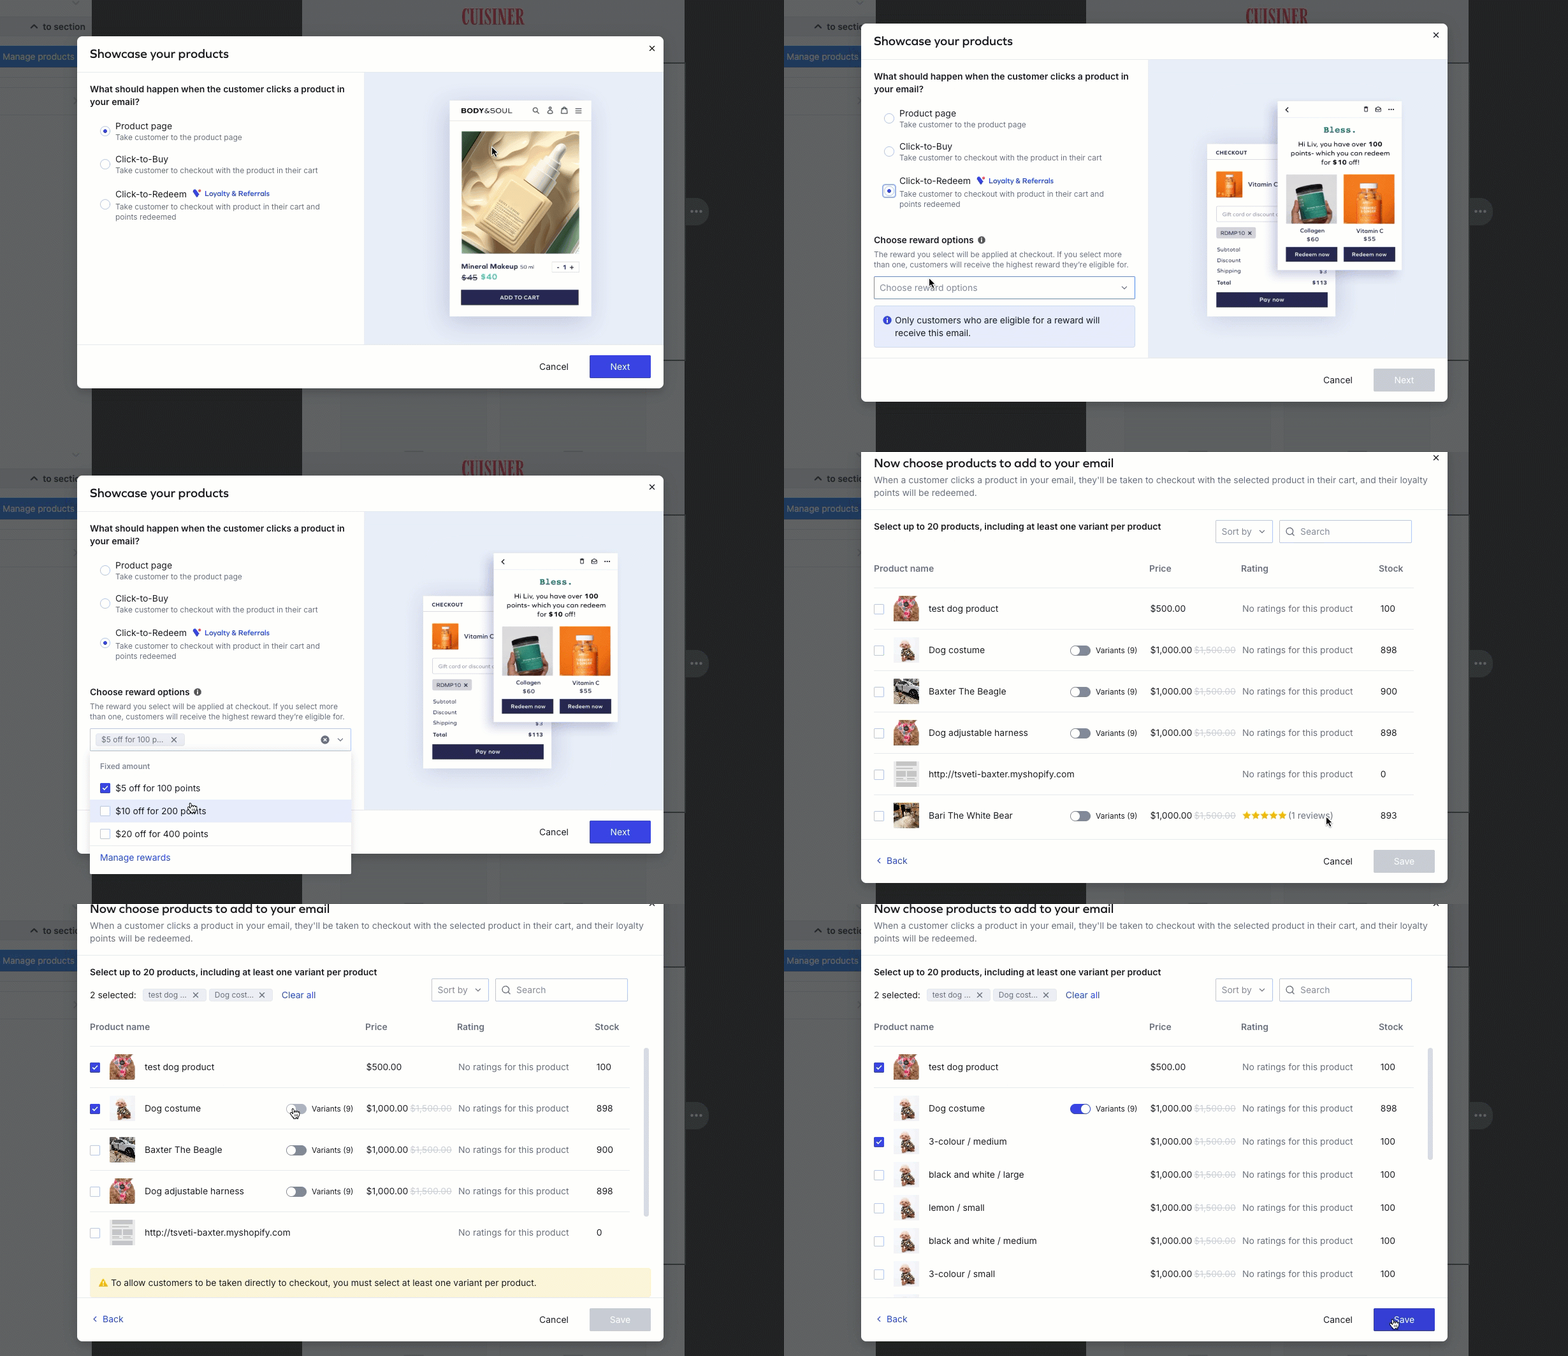
Select Click-to-Redeem, choose the rewards that will be applied at checkout for each customer, and click Next.
Note
The dropdown menu lists the rewards configured in your Loyalty & Referrals program. If you select more than one reward, customers will automatically receive the highest one they are eligible for. Use the Manage rewards link to access and edit your rewards settings.
Select products from your Shopify catalog to include in your email. If a product has variants (e.g., color, size), you must choose at least one before proceeding. When a customer clicks a product, they'll be directed to checkout with the item in their cart and their loyalty points automatically applied.
Click Save.

Customizing Your Products Block
You can customize the following product details shown in your email from the Products section on the left:
Manage products: Add or remove products.
Important
If a product is deleted or removed from your Shopify store after the email is created but before it is sent, it will automatically be excluded from the campaign or flow. This ensures customers only see available products, preventing confusion and reducing the risk of abandoned purchases. By displaying current product information, you protect potential revenue and maintain a smooth shopping experience.
Product name: Change or remove the product name. By default we automatically sync your product names from your product catalogue.
Important
You can override the product name directly in the Editor. This is useful for customizing names per market (e.g., translating into French for localized emails) or shortening long names to create cleaner layouts and avoid misalignment of your products in the product block when displaying multiple products in a row.
.gif)
Orientation: Define if your products display side-by-side or vertically.
Products in one row: Define how many products you display in a row (up to four).
Background color: Define the background color of the block.
Border: Change or remove the border of the block.
Product card composition
Image: Display or hide the product image, and select a vertical alignment.
Note
Product images update automatically based on the latest version in your Shopify store when the email campaign or flow is sent. This ensures customers see accurate visuals, minimizing confusion and reducing the risk of missed sales opportunities. By maintaining up-to-date product information, you create a more consistent shopping experience and protect potential revenue.
Name: Display or hide the product name, and define the text's color, style, alignment, etc. This will need to be manually adjusted if needed.
Price: Display or hide the product price, and define the price text's color, style, alignment, etc.
Show original price: Select this option to include the product's original (pre-discount) price. This is the Compare at price value in Shopify.
Note
Product prices will be automatically updated to reflect the latest data from your Shopify store when the email campaign or flow is sent. This keeps pricing accurate, ensuring customers see the most up-to-date information and minimizing the risk of missed sales.
Show 'Sale' label: Displays a 'Sale' label to the product. This setting is activated by default.
The Sale label dynamically updates based on your Shopify store’s active promotions. When the Show Sale Label toggle is enabled (default state), a small "Sale" label will appear next to the product card, helping shoppers spot special offers directly in the email.
If the product is not on sale at the time of designing the email, the label won’t display.
If the product goes on sale before the email is sent, the label will automatically be added, ensuring your customers see the most accurate pricing state.
Note
To disable the Sale label, click the product block, then navigate to the left pane and toggle off the Show Sale Label option.
Rating: Display or hide the product rating. Select the minimum rating for displaying the rating, define the text's color, style, alignment, etc.
Buy button: Adds a Buy button to the product that links to your store.
Next Steps
If you need design inspiration, check out our help article on Designing Your Email. You can also add a Loyalty banner to enhance the user experience.


