Goals and Outcomes
With Yotpo SMS & Email integrated into your Shopify POS system, you can seamlessly expand your subscriber list while engaging customers directly at the point of sale. You’ll empower your business to create meaningful, personalized connections that drive repeat purchases and enhance customer loyalty.
By following this guide, you will:
Set up a streamlined process to collect SMS and email subscribers during in-person transactions.
Learn best practices to ensure compliance while maximizing subscription rates.
Unlock the ability to manage and nurture subscribers through targeted campaigns designed to boost revenue.
Let’s get started to ensure your point-of-sale interactions contribute to long-term customer relationships and business growth!
Important
Currently this feature is only available for the United States and Canada.
Shopify POS Overview
The Yotpo SMS & Email integration with Shopify POS helps you build a stronger connection with your customers by effortlessly collecting subscriber information at the point of sale. With this feature, you can capture SMS and email opt-ins during in-person transactions, ensuring you comply with consent regulations while growing your audience.
This integration enhances your ability to nurture relationships through personalized messages and campaigns. It empowers you to take advantage of every customer interaction, turning one-time buyers into loyal subscribers who are excited to hear from your brand. With a simple setup process and clear workflows, this feature ensures that you can focus on building a thriving subscriber base while managing compliance seamlessly.
By utilizing this feature, you position your business to reach customers on their preferred channels, drive engagement, and boost overall revenue. Let’s explore how you can make the most of this valuable tool!
Getting Started
The first step is to download the Shopify Point of Sale (POS) application from the App Store (for iOS) or Google Play (for Android). Please keep in mind that Google Play has not yet been updated to the latest version of the app, so menus, features, and design for Android look a bit different than those for iOS.
Note
Google Play has not yet updated to the latest version of the app, so menus, features, and design for Android look a bit different than those for iOS.
When you download the app, you need to log in with your Shopify store credentials:
email address
password
More detailed information on how to get started with Shopify POS can be found in this guide. If you want to switch to the new app, go to Step 5.
Collecting Subscribers at POS
The first thing you need to do to start collecting subscribers with the Shopify POS app is adjust some of the main settings.
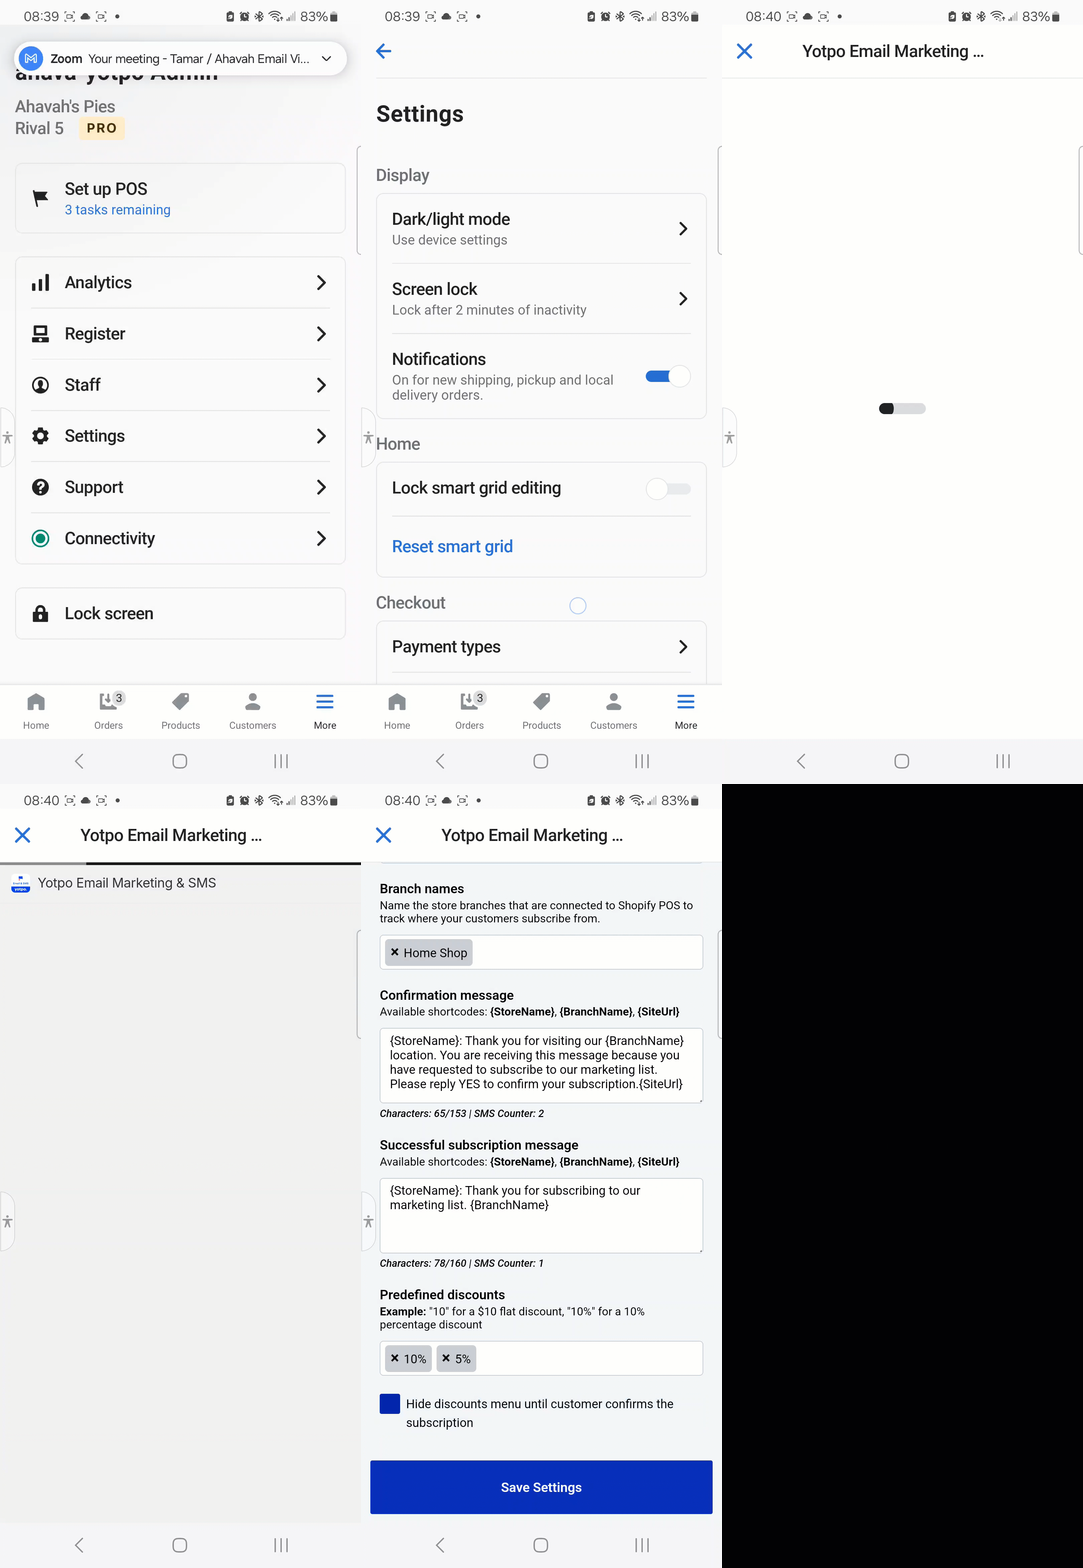
From the main menu of the Shopify POS click Home > Settings.
Scroll down to All Apps and click on SMSBump: SMS Marketing & Email.
Important
You need to have the app installed to your Shopify store for the app to appear in Shopify POS as well.
All you need to do afterward is complete the following 5 simple steps.
Step 1: Fill in Branch Names
Make sure you fill in the information about your store locations (branches). This will help you later on if you want to know where your subscribers came from.
Currently, this feature is only available for the United States and Canada, which is why you can’t change the default country code.
Step 2: Set a Confirmation Message
This is the content of the text message your customers will receive after the store clerk fills in their phone numbers. Keep in mind that it is a 2-step subscription process, meaning that your customers will need to reply to this text with YES in order to opt in for your text marketing services.
Make sure this confirmation message contains relevant information. There are a total of 3 available shortcodes that you can use for that:
{StoreName} - shows the name of your store
{BranchName} - shows the location of the store the customers is in
{SiteUrl} - the link to your Shopify store
Here is a sample confirmation SMS:
{StoreName}: Thank you for visiting our {BranchName} location. You are receiving this message because you have requested to subscribe to our text marketing list. Please reply YES to confirm your subscription.
Step 3: Set a Successful Subscription Message
This is the message your customer will receive when they reply YES to the confirmation message. Keep it short with a simple: Thank you for subscribing.
Step 4: Set a Discount
The last step is to set up the different incentives you are going to offer to your customers while in store for subscribing to your text marketing service. It could be either a fixed discount of $10 or a percentage discount, for example 5%. In the Predefined discounts section you can specify the discounts that your staff can offer at the moment of purchase.
If you want to wait until the customer has confirmed their subscription, you can hide the discounts menu by using the following steps:
From the Shopify POS home screen click More.
Click on Settings.
Scroll to Apps and click on All apps.
Select Yotpo Email Marketing & SMS.
Scroll to the bottom and mark the check box next to Hide discounts menu until after customer confirms subscription.
Click Save Settings.
Visual Walkthrough

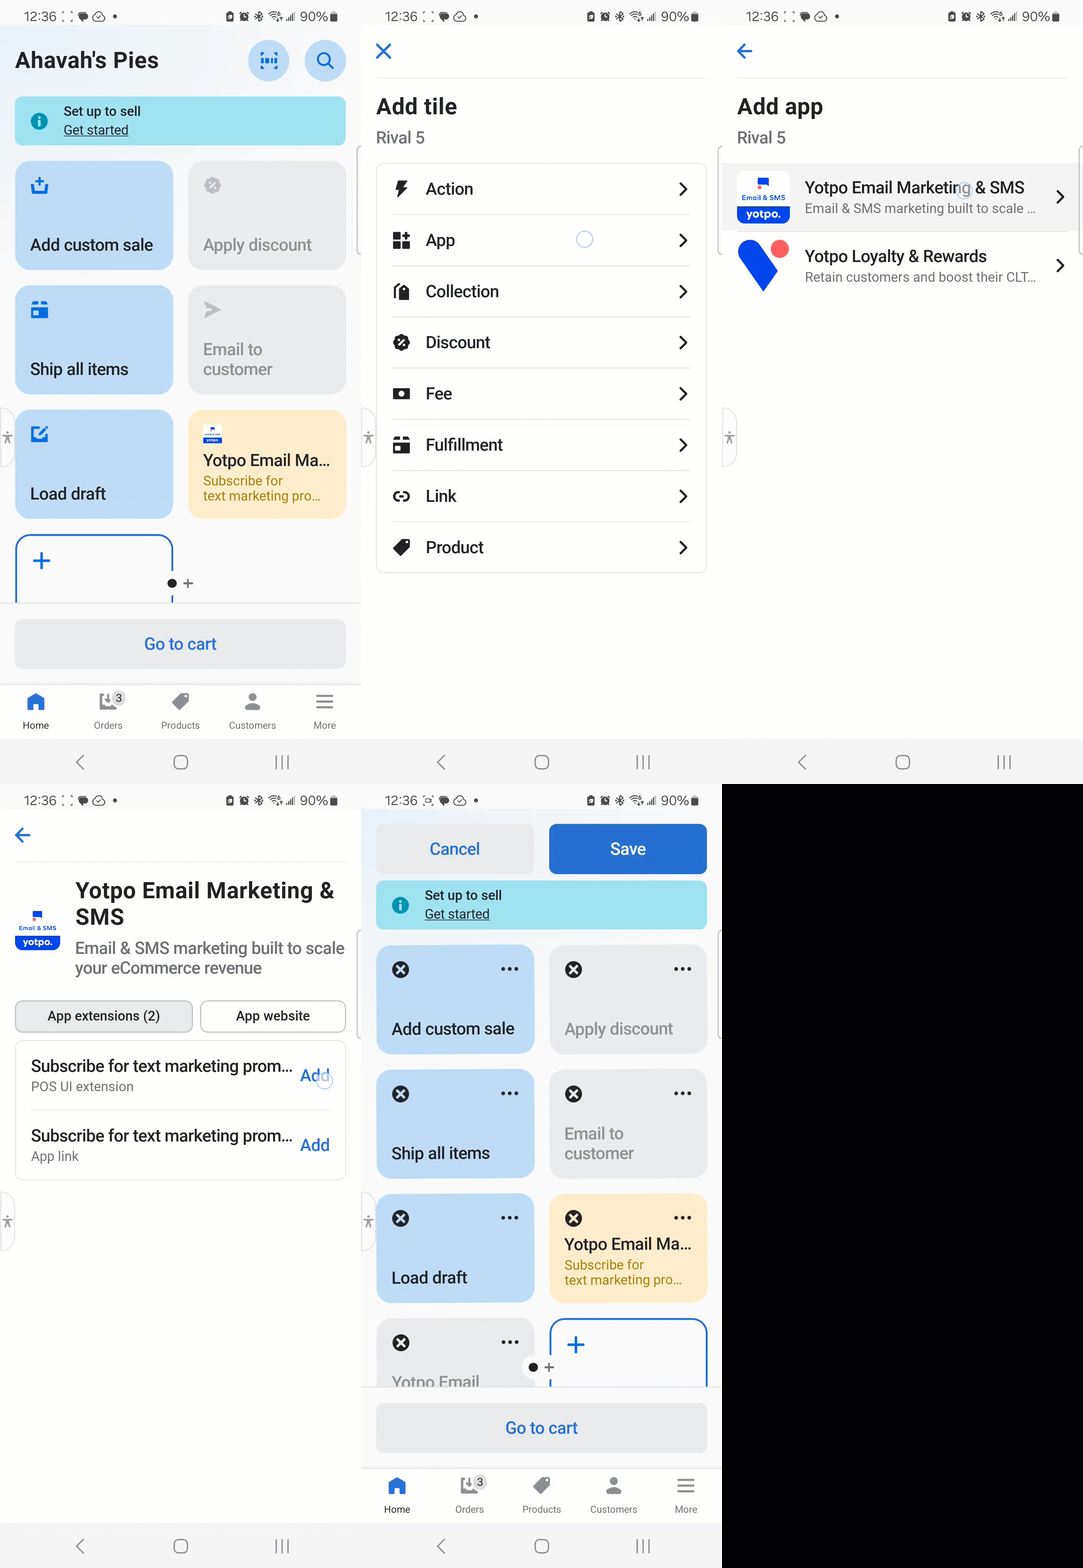
Step 5: Adding the Yotpo SMS & Email Tile
Go to Home, tap on Add tile, and from the apps menu select Yotpo SMS & Email Marketing.
Find the App extension labeled POS UI extension and click Add.
Click Save to save the tile in your Shopify POS.
Visual Walkthrough

Now you can open the app by simply tapping on the tile you just added!
Testing Your POS Subscriber Collection
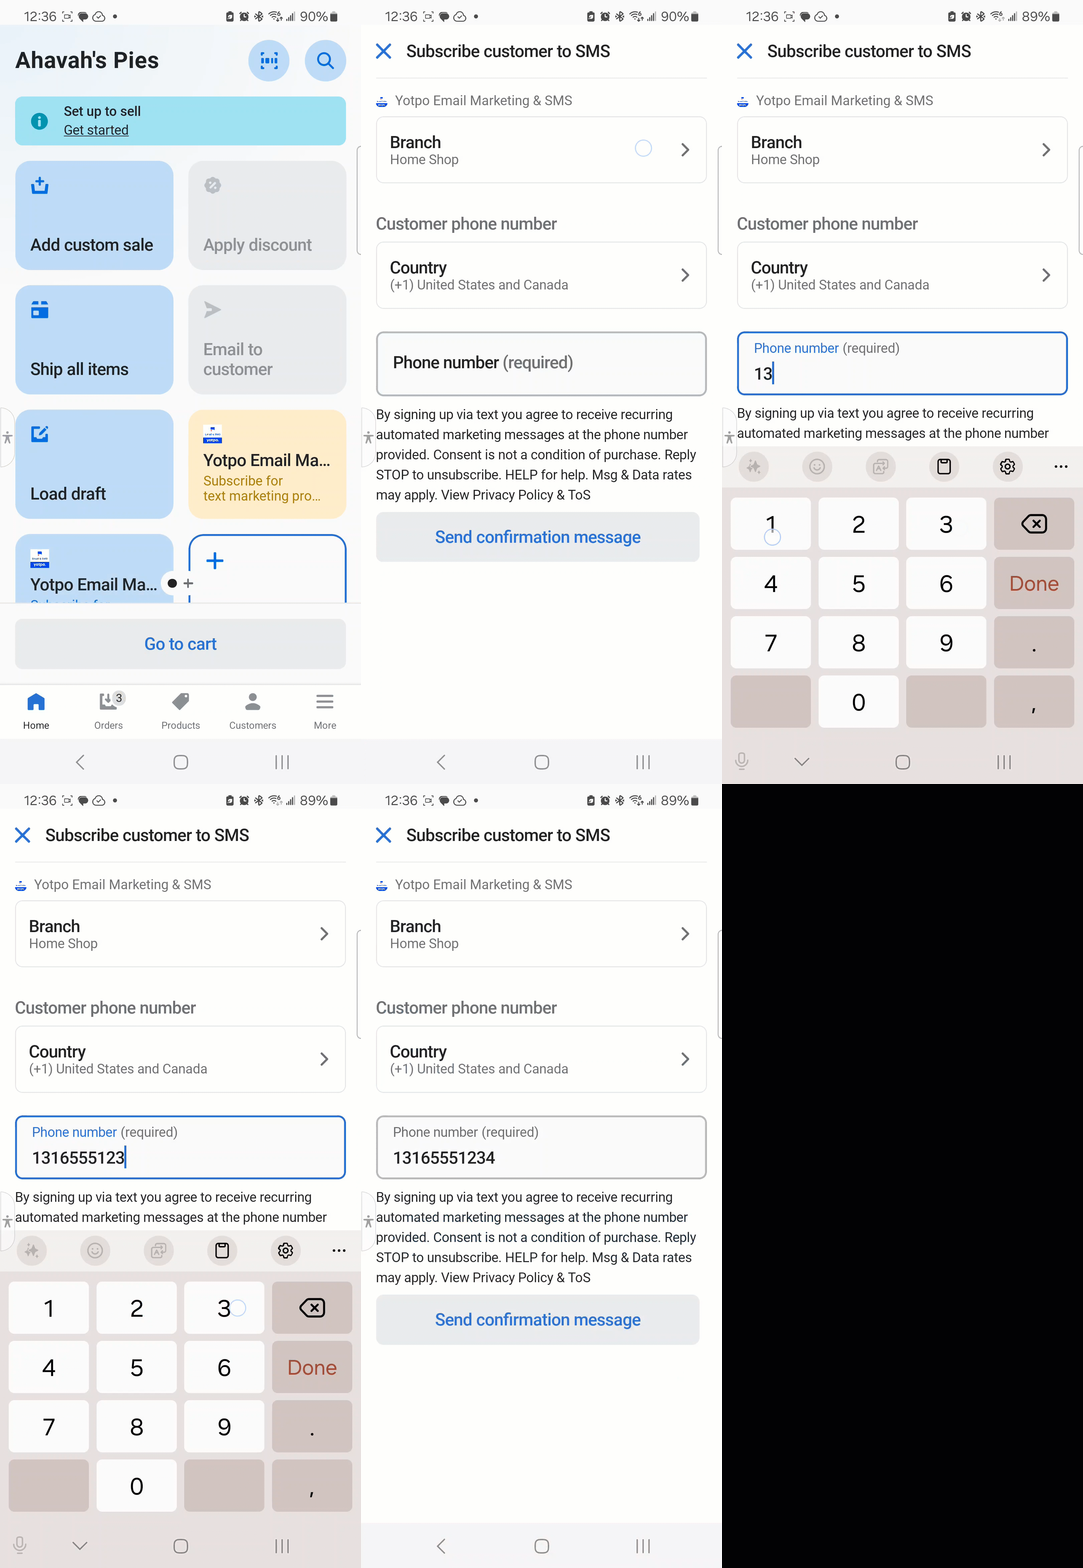
Now that you have successfully configured the settings of your Shopify POS app and added the tile, let’s check how it happens in real-time.
Imagine that your customer is at the cashier desk of your store in CityMall. A member of your staff offers them to opt-in for your text marketing services and receive a 5% discount on their current purchase. The customer agrees and provides their phone number.
What your staff representative needs to do next is go to the Shopify POS app and click on the Yotpo SMS & Email Marketing tile. Then choose the correct location under Branch name and fill in the customer’s phone number. When the associate clicks the Send subscription confirmation button, the customer will receive the Confirmation message. Now the status will change to Awaiting Confirmation. Keep in mind that if the customer has already registered for your text marketing services, you will see this message, The phone number is already subscribed.

As soon as the customer replies YES to the Confirmation Message (therefore agrees to become a subscriber and receive text marketing updates from you), the status changes to Confirmed and then, if you have hidden your discounts menu, the staff member is able to assign the offered discount. They can select from the predefined discounts in the app or make a custom discount.
And now this particular discount can be applied to the customer’s current purchase and the staff member can continue with the checkout as usual. This customer has completed the 2-step subscription process and agreed to receive marketing updates from your brand.
Important
Discounts will only be applied if the customer has at least one item in their cart.
Additionally, this discount replaces any other discounts the customer has applied since the welcome discount does not stack with other discounts.
Collected phone numbers via Shopify POS will become part of your general Text marketing list, allowing you to target your subscribers from different store locations with tailored offers and send them personalized text messages.
This will help you grow your lists, make more targeted segments, extend more personalized offers and achieve better results with your next text marketing campaigns.