Defining the Behavior of Your Popup
- DarkLight
Defining the Behavior of Your Popup
- DarkLight
Article summary
Did you find this summary helpful?
Thank you for your feedback
Feature Overview
Your popup is the first impression many customers have of your brand’s email and SMS campaigns. It serves as a gateway to growing your subscriber base and boosting customer engagement. With Yotpo SMS & Email, you can define how your popup behaves to suit your unique business goals, ensuring a seamless and effective user experience.
By customizing the behavior of your popup, you can:
Maximize Engagement: Tailor triggers, display frequencies, and user interactions for optimal conversion.
Optimize Performance: Adjust settings to balance visibility with non-intrusive customer experience.
Boost Conversion Rates: Encourage sign-ups by delivering well-timed, personalized messages.
Take control of this powerful tool to ensure it complements your marketing strategy while delighting your customers.
Getting Started
You’ll find the Behavior settings for your popup right at the bottom of the Layout Settings menu in the popup editor.
Defining Your Popup’s Behaviors
Delay
Here’s where you decide when your popup will appear after a visitor lands on your website. You can set a delay to display it after a specific amount of time once the visitor has scrolled a percentage of the page or both. Based on our experience, a delay of 5 seconds or displaying the popup when your customer shows exit intent works best.

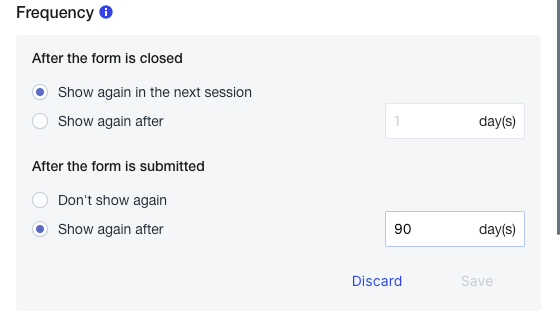
Frequency
Now it’s time to decide how often your popup will appear to your website visitors. If someone closes it, you can choose to show it again during their next session or hide it for a specific period. If they submit the form, you can set it to stay hidden for a longer time or ensure it doesn’t appear again.
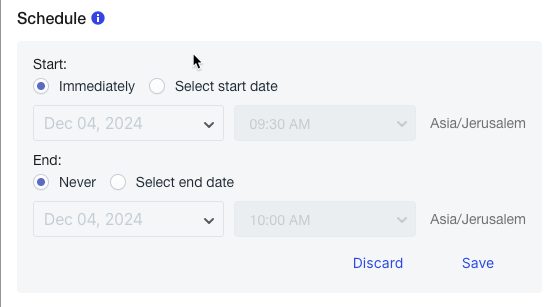
Schedule
You can control exactly when your popup appears and when it stops displaying. Choose to start the popup immediately or set a specific start date and time that works best for you. Similarly, decide whether to keep the popup running indefinitely or set an end date to align with your goals. With scheduling, you can automate when your popups appear, no need to switch them manually. For example, set your festive holiday popup to run for a few weeks, then have your regular one automatically take over. It’s a simple way to stay on track and avoid manual errors.
These flexible options help you match your popup schedule to your marketing strategy perfectly.
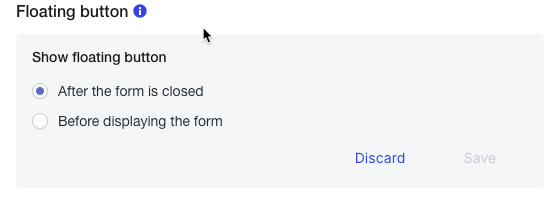
Floating Button
This feature offers a dynamic and non-intrusive way to keep your popup accessible by displaying it as a floating button as visitors scroll through your page. After adding the floating button as s step in your popup you can decide when it appears: either before showing the full popup or after the form is closed. We recommend setting the Floating Button to appear after the popup is closed. This way, visitors who’ve seen the form but change their minds about subscribing later can easily access it again.
Advanced Conditions
Finally, don’t forget about the Advanced Conditions section! Once you enable it, you’ll see all active conditions listed here.
To explore your options, click Add Condition to view the full list of available settings, each with a brief description to help you choose the best fit for your needs.
.png)
Advanced Condition | Condition Definition |
|---|---|
Easy Close | Add this condition to let visitors close the popup by clicking anywhere outside of it. Activate it by clicking the toggle button on the right. |
Exit Intent | The trigger shows your popup as soon as a visitor’s behavior suggests they’re about to exit your store (like moving their cursor toward closing the tab). Activate it by clicking the toggle button on the right. |
Click Based | This option lets your popup appear whenever a user clicks on a specific button on your website. Simply add the button’s CSS Class/HTML ID in the empty box, choose the corresponding option from the dropdown menu on the left, click +, and then Save Trigger. If you want to show the popup only once per session, make sure to tick the checkbox below. |
Specific URL | This condition lets you include or exclude visitors from seeing your popup when they visit a specific URL. For example, if you want to show the subscription form to people coming from a specific social media campaign, set the condition to “Show in Campaign IF”, paste the link into the text box, and click +. |
Part of URL | Similar to the previous option, this condition lets you include or exclude visitors coming from URLs containing specific parts from seeing your popup. To set it up, simply enter the part of the URL in the empty box, click the + button, and save. |
Geo Targeting | Staying true to its name, this condition lets you show or hide your popup for shoppers from specific countries. Let’s say you run an international store and want to launch a campaign for a specific audience. For example, you can display a popup with a welcome message in French, shown only to visitors from France. Simply choose the type of action, select a country from the drop-down menu, click +. |
Sequence | Use this option to show or hide your campaign for visitors coming from a specific path of pages. Simply select the type of action, paste the URLs into the empty box, click +, and save your changes. |
Page Count | This option lets you show or hide your campaign based on the number of pages visitors click on during the current session or across all sessions. Simply enter the number in the text box and select the specific conditions from the drop-down menus. If you check Count only unique pages, the Destroy session checkbox will appear. This allows you to delete a visitor’s history after a set amount of days, hours, minutes, or seconds once they leave your website. Once everything is set, click the Save Trigger button to apply your changes. |
Hide Campaign | This one is straightforward. It lets you activate or deactivate your campaign—just choose your preferred option and click Save Trigger. |
Show Count | If you want to avoid overwhelming your frequent visitors with the same popup, enable this option. Enter the number of times your subscription form should appear, after which your campaign will automatically hide. Remember to save your changes. |
Specific Referral | This condition allows you to show or hide your campaign for visitors coming from a specific referral URL. Simply choose the action type, enter the link in the text box, click the + button, and save. |
Specific UTM | This condition lets you target your audience based on a UTM campaign with specific parameters. A UTM (Urchin Tracking Module) is a snippet of code added to the end of a URL that helps you track where your customers are coming from. If you want to show or hide your campaign for people arriving from a specific source, medium, or campaign name, just enter your UTMs in the corresponding boxes and click + to add them to the list. |
You’re all set! Add as many advanced conditions as you like to ensure your popup campaigns reach the right people at exactly the right moment!
Was this article helpful?