- DarkLight
Setting Up Loyalty & Referrals on Adobe Commerce 2
- DarkLight
This article provides a comprehensive walkthrough of the steps required to install Yotpo Loyalty & Referrals on the Adobe Commerce 2 (previously Magento 2) extension.
Step 1: Log In to Loyalty & Referrals
To get started:
Log in to your existing account or reach out to your Loyalty & Referrals account representative to create a new one.
Step 2: Installing the Adobe Commerce 2 extension
Next, you'll need to install the loyalty module. This can be done in one of two ways:
Composer Installation
- Install via composer by running the following command under your Adobe Commerce 2 root dir.
composer require yotpo/magento2-module-yotpo-loyalty
php bin/magento maintenance:enable
php bin/magento setup:upgrade
php bin/magento setup:di:compile
php bin/magento setup:static-content:deploy
php bin/magento maintenance:disable
php bin/magento cache:flush
Manual Installation (under app/code)
- Download and place the contents of Yotpo's Core Module under {YOUR-MAGENTO2-ROOT-DIR}/app/code/Yotpo/Core.
- Download the contents of Yotpo's Loyalty Module either from the Marketplace or from Github and place it under {YOUR-MAGENTO2-ROOT-DIR}/app/code/Yotpo/Loyalty
- Run the following commands under your Adobe Commerce 2 root dir:
php bin/magento maintenance:enable
php bin/magento setup:upgrade
php bin/magento setup:di:compile
php bin/magento setup:static-content:deploy
php bin/magento maintenance:disable
php bin/magento cache:flush
Step 3: Configure the Adobe Commerce 2 Loyalty & Referrals extension
It is crucial to make sure you integrate the correct admin to the correct environment.
Meaning:
- Integrate live Adobe Commerce environment to the live Loyalty admin
- Integrate the staging Adobe Commerce environment with the staging Loyalty admin.
Due to Adobe Commerce's authentication process, you cannot switch the integration once you have integrated with a particular admin. If you connect the wrong ones, swapping between instances will result in invalid coupons.
If the integration is set up correctly, you should see new customer profiles pushing into your Loyalty admin in real time.
Once the module has been installed:
- Log in to your Adobe Commerce 2 admin
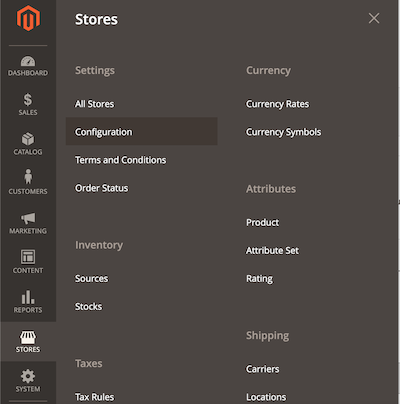
- Click Stores
- Click Configuration

- Select Default Store View from the drop-down list
- Select Yotpo from the main menu
- Click Loyalty & Referrals
- From your Loyalty & Referrals Settings page, copy your GUID and API key and paste each one into the relevant fields in the Adobe Commerce Configuration page
- Click Save Config
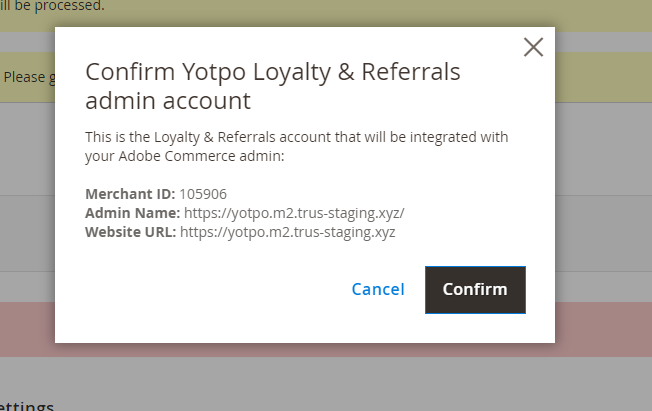
- A popup will open asking you to confirm your Yotpo Loyalty & Referrals admin account.
- If the admin account information is correct, click Confirm
- If you are seeing the wrong account information, click Cancel and revise the GUID and API key

If prompted with an error message, make sure that the API Key and GUID you entered match the values shown in your Loyalty & Referrals admin settings.
Having trouble with the GUID and API Key? You can try the following troubleshooting steps:
1. If you're unable to change the API Key and GUID fields, make sure that the Use System value checkbox is unchecked on all the general settings, and the Enabled setting is set to Yes:
2. If everything is enabled, and the API Key and GUID are correct, it's possible that the Loyalty & Referrals API servers are unable to reach your Adobe Commerce Instance. If you're on an IP-restricted network, you'll need to allowlist (whitelist) the elastic IP used by Loyalty & Referrals app server. To view the list of elastic IPS, see Allowlisting Yotpo Loyalty & Referrals Elastic IPs.
Advanced Settings
Sync Settings
For most use cases, there is no need to change these default settings. However, there are a few advanced settings that can be configured under Sync Settings.
Advanced
These are two settings that can help you better control your loyalty implementation. 
| Settings | Description |
|---|---|
| Sync limit | The maximum number of webhook requests (=events like orders, refunds) to be sent to Yotpo (usually every minute). |
| Sync max - tryouts | When the sync between Adobe Commerce and Yotpo is unsuccessful, this parameter will define the number of times to retry. |
| Keep sync history | Defines how long to keep old sent/failed events (e.g. orders, refunds) in the database. This is set to 1 month by default. |
| Checkout variable instance ID | This option automatically adds a checkout module to your Adobe Commerce store. In order for this to work you need to first create a checkout module and then you need to add that module's instance ID. The module's instance ID appears when you publish a module. |
| Delete used coupons and price rules | This setting applies to merchants using a variable redemption option. In this case, Yotpo creates a new price rule for every redemption (since every redemption is a different amount). Multiple price rules can overload the checkout, which is why we added this setting to delete price rules and coupons that have already been used by customers. |
Step 4: Order & Discount Processing
With the Adobe Commerce extension installed, your Adobe Commerce instance will now send notification requests to the Loyalty & Referrals API whenever an order is created or its status is updated. Since Loyalty & Referrals will be receiving a request for all status updates, you'll need to configure Loyalty & Referrals to know which states and statuses you want Loyalty & Referrals to act on.
Points Earned vs. Discounts
It's important to understand the difference between processing an order for points earned, and processing discounts applied to an order to deduct points from a customer.
If you're using Loyalty & Referrals' advanced redemption at checkout experience, we recommend delaying the deduction of points from a customer's account until after the order is placed. As customers may change their mind about the number of points they wish to redeem or abandon checkout altogether, it's best to deduct points only after the order is placed.
In the Loyalty & Referrals admin, you can specify RegEx for both the status and the state that you want Loyalty & Referrals to use to process discounts (deduct points used from customer balances) and for when you want Loyalty & Referrals to process the order for points.
- The Order Paid State and Order Paid Status RegEx are used to determine when Loyalty & Referrals should deduct the points for discounts used.
- The Process Order With State and Process Order With Status Regex are used to determine when Loyalty & Referrals should process the order for earning points.
- As a default, we recommend using an order paid state Regex of processing|complete so that Loyalty & Referrals can process a submitted order for points used immediately.
- As a default, we recommend using a process order with state Regex of complete so that we only award points once the order is completed.


