Checkout On-site Module
- DarkLight
Checkout On-site Module
- DarkLight
Article summary
Did you find this summary helpful?
Thank you for your feedback
The Checkout Module is a highly customizable way to let customers redeem their points at checkout. You can deploy a new module in minutes, with no development required.
Note
If customers redeem a coupon or referral code through the on-site checkout module but do not complete their order, their points will be restored.
In this article, you'll learn how to access, customize, and deploy the Checkout module on your site.
Using Shopify Plus?
Refer to our Shopify checkout extension.
Accessing the Checkout module
From the main menu, go to Display On-Site > Checkout.
Click Edit on the instance you wish to edit or click "+ Create new"
Note
Your module won't appear on your site until you deploy it.
Types of Checkout modules
There are two types of Checkout Modules. See a guide to which one you should use.
If you offer fixed-amount/percentage coupons:
If you are using fixed-amount/percentage coupons, you will implement a Dropdown menu module at checkout.
A fixed-amount coupon means you only offer coupons in pre-set amounts such as $10 off, $20 off, or $25 off. Percentage coupons offer a pre-determined discount percentage value, for example, a 15% discount coupon for 100 points, or a 10% discount coupon after completing a campaign.
If you use variable coupons:
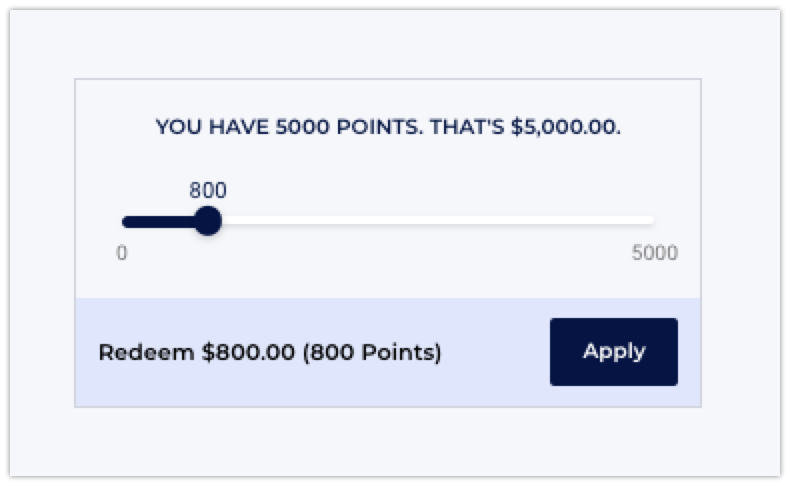
If you are using a variable coupon system, you will implement a Slider bar module at checkout.
A variable coupon means you let customers redeem points on a sliding scale defined by a points-to-dollars ratio. For example, if your ratio is $1= 10 points, then 1234 points = $123. Shoppers can redeem dynamic discount amounts depending on how many points they have.
Dropdown Menu module (Fixed-Amount/Percentage Coupons)
To prevent customers from losing points, they cannot apply a coupon that is greater than the cart amount+1. For example, if the cart is $29.95 the customer can apply a coupon for up to $30.95.
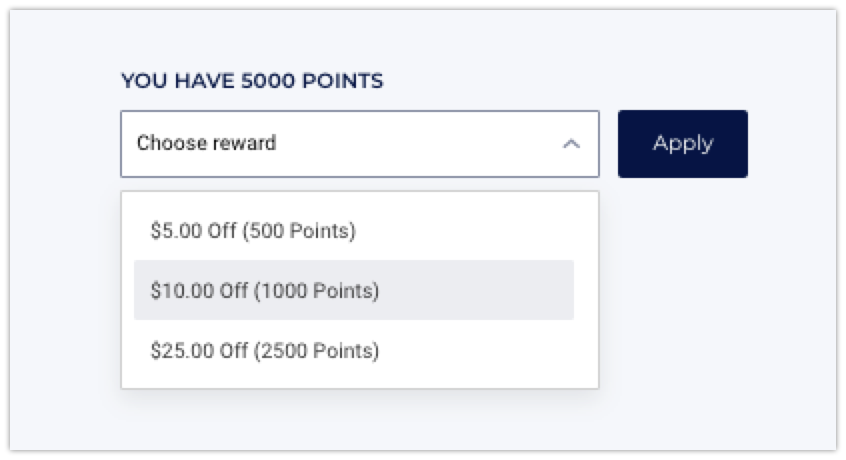
Dropdown menu: Select redemptions
Select redemptions to display in the drop-down menu. You can choose from the rewards that you already created.
Dropdown menu: Appearance & text
Settings
Fonts
The primary and secondary fonts are two fonts that will apply in several places throughout your module.
Primary font
The font you choose here will apply to Point balance message, and Button text
Secondary font
The font you choose here will apply to Menu items in the dropdown.
Point balance message
You can include one of the following variables:
{{point_balance}} - This shows how many points the customer currently has. For example 500 points.
{{Points_as_credit}} - This shows how many points the customer has in terms of store credit. For example $5.00.
Button style
Button color
Button text color
Advanced
CSS editor
If you'd like to make further customizations to the module, use our embedded CSS editor. Learn more about the Advanced CSS editor.
If you are using the CSS Editor, you may see a notification asking you to update your Module version from time to time. Read more about module versions.
Dropdown menu: Display messages

Not enough points This message will be displayed if the customer doesn't have the minimum number of points to make a redemption.
Slider Bar module (Variable Coupons)
To prevent customers from losing points, they cannot apply a coupon that is greater than the cart amount + 1. For example, if the cart is $29.95 the customer can only apply a coupon for up to $30.95.
Note
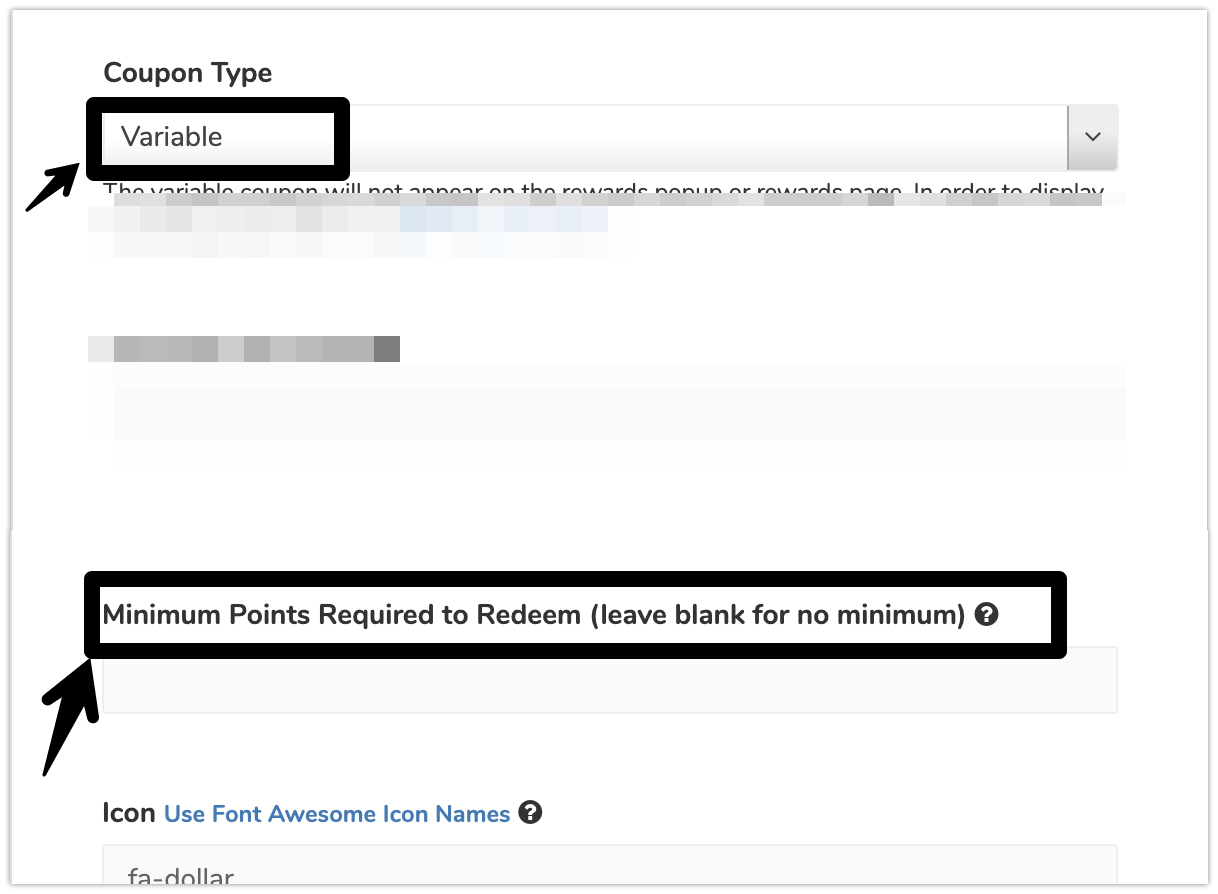
To use the slider bar version, you need to have at least one variable redemption coupon set up
Setting up a variable coupon
Available for
Merchants using BigCommerce, SFCC, Adobe Commerce, or a generic platform. For Shopify and Shopify Plus, refer to this article
If you already have an existing variable coupon set up, you can skip the following steps.
From the main menu go to Rewards > Redeeming Points.
Click Create a New Coupon
Set Coupon Type to Variable.
Customize the other setting, and click save.
To learn more about variable cash discounts, refer to this article
Slider bar: Appearance and text
Fonts
The primary and secondary fonts are two fonts that will apply in several places throughout your module.
Primary font
The font you choose here will apply to Point balance message, and Button text.
Secondary font
The font you choose here will apply to confirmation message text.
Point balance message
Message font size
Message color
Slider bar
Slider bar color
Progress color
Confirmation message
Text
Button style
Button color
Button text color
Advanced
CSS editor
If you'd like to make further customizations to the module, use our embedded CSS editor. Learn more about the Advanced CSS editor.
Slider bar: Display messages
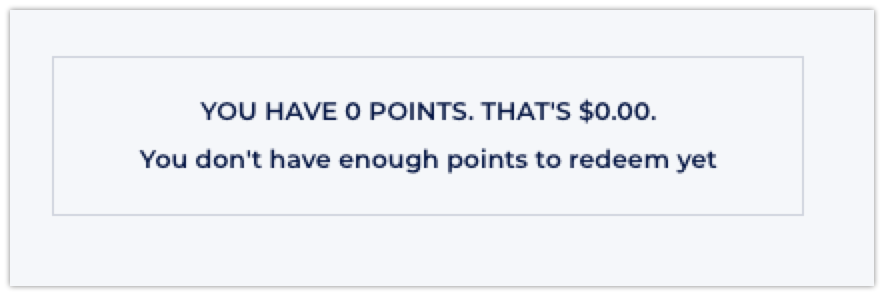
Not enough points
This message will be displayed if the customer doesn't have the minimum number of points to make a redemption. You can adjust this with the Minimum Points Required to Redeem setting to on your variable coupon in the Loyalty admin.
Open your Loyalty admin.
Click the Rewards tab.
Create a new coupon or click Customize on your existing variable coupon.
Scroll down to the Minimum Points Required to Redeem setting.
Click Save.
Available for
Merchants using BigCommerce, SFCC, Adobe Commerce, or a generic platform. For merchants on Shopify and Shopify Plus, refer to this article
Advanced CSS editor
If you'd like to make further customizations to the module, use our embedded CSS editor. If need to make any overriding changes to the Checkout Module CSS, use this class name before the class you want to override:
For Slider Module
.yotpo-checkout-variable-widget.yotpo-widget-override-css {
}
For Dropdown Module
.yotpo-widget-checkout-redemptions-widget.yotpo-widget-override-css {
}
Please note:
Please make sure to use our embedded CSS editor instead of hardcoding directly onto your storefront.
We will not update a specific module instance if we detect that it will impact your live module version. Our team can only detect these issues if the CSS is in our editor.
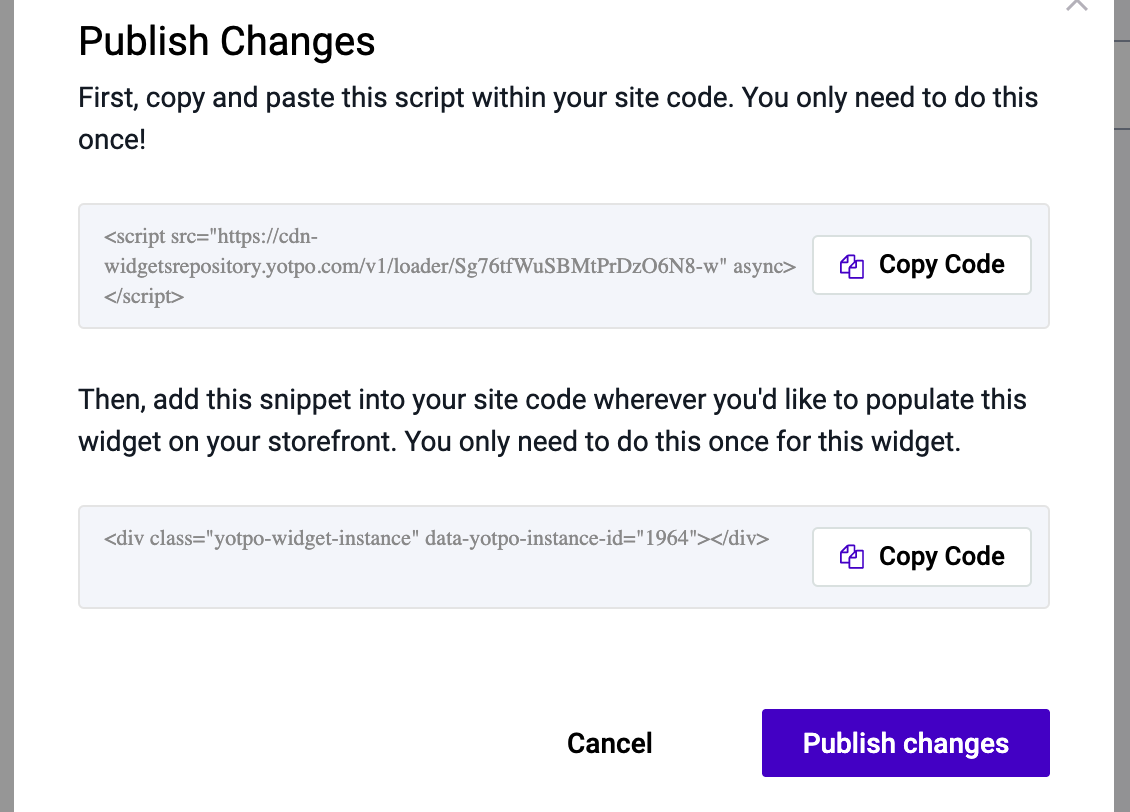
Publishing the module
Using Shopify Plus?
Before following the process below, reach out to Shopify and request access to your checkout.liquid file.
Copy & paste this snippet once to show all the Modules you may want to embed on your checkout page. Make sure to replace the <YOUR GUID HERE> section with your account's GUID.
<script src="https://cdn-
widgetsrepository.yotpo.com/v1/loader/<YOUR GUID HERE>" async></script>
Click the Publish button.
Embed the second snippet on your checkout page.
Click Publish changes.
Additional resources for Shopify Plus users
Read more on Shopify's website about editing the Checkout page.
No matter where the code is placed, the module will always populate in the side panel above the price summary. If you would like the module to appear below the price summary instead, do so with advanced customizations. If you would like the module to appear elsewhere in the checkout flow, front-end development is required.
Free product at checkout
Note
Implementing free products at checkout is supported on the following eCommerce platforms: Shopify Plus, Magento 2, and Salesforce Commerce Cloud. You also can offer a free product redemption option at checkout.
To do so:
Follow the steps to deploy your Free Product module at checkout.
Activate Module
Active
If your module is active (green dot), this means that any changes you publish will be reflected on your store if the module snippet is embedded.
Inactive
If your module is inactive (yellow dot), this means that any changes you publish/save will not be reflected on your store. This also means if you had the module snippet embedded and active on your store before, it will not be visible when inactive.
You're all set!
Advanced customizations
Some additional customizations can be made to the module if you are savvy with code. See below the advanced options.
The following attributes can be added to your module's code snippet, just after your instance ID. For example, if your module's code snippet looks like this:
<div class="yotpo-widget-instance" data-yotpo-instance-id="0000"></div>
Then add the attribute here:
<div class="yotpo-widget-instance" data-yotpo-instance-id="0000" add-attribute-name=value> </div>
If you want to add multiple attributes, add them one after the other, separated by spaces.

Advanced attributes for Dropdown
shopify-inject-after-discount-section="true"By default in Shopify Plus, the module will appear above the discount section in the right-hand panel. If you want it to appear below the discount section, then use ="true".
apply-error-text="insert your own text here!"
Text when the "apply" button fails. Default: “There was a problem redeeming your coupon”point-balance-error-text="insert your own text here!"
Text when the system fails to get the point balance of the customer. Default: “There was a problem retrieving your point balance”retry-button-text="insert your own text here!"
Text of the button when fail to get point balance or dropdown options. Default: “Retry”show-remove-discount-tag="true/false"Show a remove discount tag as part of the module. You need to choose either true or false.
remove-tag-font-size=font size in pixels
The font size of the remove tag. You need to put in a number, for example, 14.discount-removal-failure-text="insert your own text here!"Text when the system fails to remove the discount. Default: “There was a problem removing your coupon”
reload-page-after-redeem="true/false"
Controls whether to refresh the screen right after a successfull apply. Relevant for commerce cloud where the page doesn’t get changed automatically.reload-page-after-discount-removal="true/false"
This is the same as reload-page-after-redeem, but for discount removal. You need to choose either true or false.shopify-expand-order-section="true/false"
On Shopify, the module is located inside the order summary section. This section is not expanded by default on Mobile. This customization controls whether to expand this section automatically when the module gets loaded. You need to choose either true or false.max-discount-margin-from-subtotal=The margin between the cart subtotal and the highest amount of the redemption option that is available for redemption at checkout. For example: if the cart subtotal is $29.00, and we have a coupon for $30.00. If
'max-discount-margin-from-subtotal'is set to 0, the discount amount will not be available. If set to any value equals or greater to 1, it is available.Default value: 1
Advanced attributes for Slider
A list of advanced attributes for the Slider Module:
shopify-inject-after-discount-section="true/false"By default, In Shopify Plus, the module will appear above the discount section in the right-hand panel. If you want it to appear below the discount section, then use ="true".
point-balance-error-text="insert your own text here!"
Text when we fail to get the point balance of the customer. Default: “There was a problem retrieving your point balance”redemption-option-error-text="insert your own text here!"
Text when the system fails to get the redemption option (the coupon configuration). Default: “We failed to retrieve your coupons”apply-error-text="insert your own text here!"
Text when the apply button fails. Default: “There was a problem applying your discount”coupon-display-text="insert your own text here!"
In the platforms, the text of the discount is the coupon code. On Shopify and Commerce Cloud (in the remove tag), we rename to hide the coupon code. This customization controls this text Default:'{{discount_amount}} Off'discount-removal-failure-text="insert your own text here!"
Text when the system fails to remove the discount. Default: “There was a problem removing your coupon”remove-tag-font-size=Font size in pixels
The font size of the remove tag. You need to write a number, for example, "14".remove-tag-icon-size=Font size in pixels
The X icon size of the remove tag. Default: 9.shopify-expand-order-section="true/false"
On Shopify, the module is located inside the order summary section. This section is not expanded by default on Mobile. This customization controls whether to expand this section automatically when the module gets loaded. You need to choose either true or false.restrict-rounded-discount="true/false"
By default, we allow the slider to use any amount of points/maximum possible in the cart. This means that a discount can be unrounded. For example a discount of$7.84. This customization controls whether we force a rounded discount. This is done by setting an interval of points which is different than 0. You need to choose either true or false.show-remove-discount-tag="true/false"
Show a remove discount tag as part of the module. You need to choose either true or false.reload-page-after-redeem:="true/false"
Controls whether to refresh the screen right after a successful coupon application. Relevant for commerce cloud where the page doesn’t get changed automatically. You need to choose either true or false.reload-page-after-discount-removal="true/false"
same as reload-page-after-redeem, but for discount removal. You need to choose either true or false.
Was this article helpful?