Adding the Free Products Widget to Your Store
- DarkLight
Adding the Free Products Widget to Your Store
- DarkLight
Article summary
Did you find this summary helpful?
Thank you for your feedback
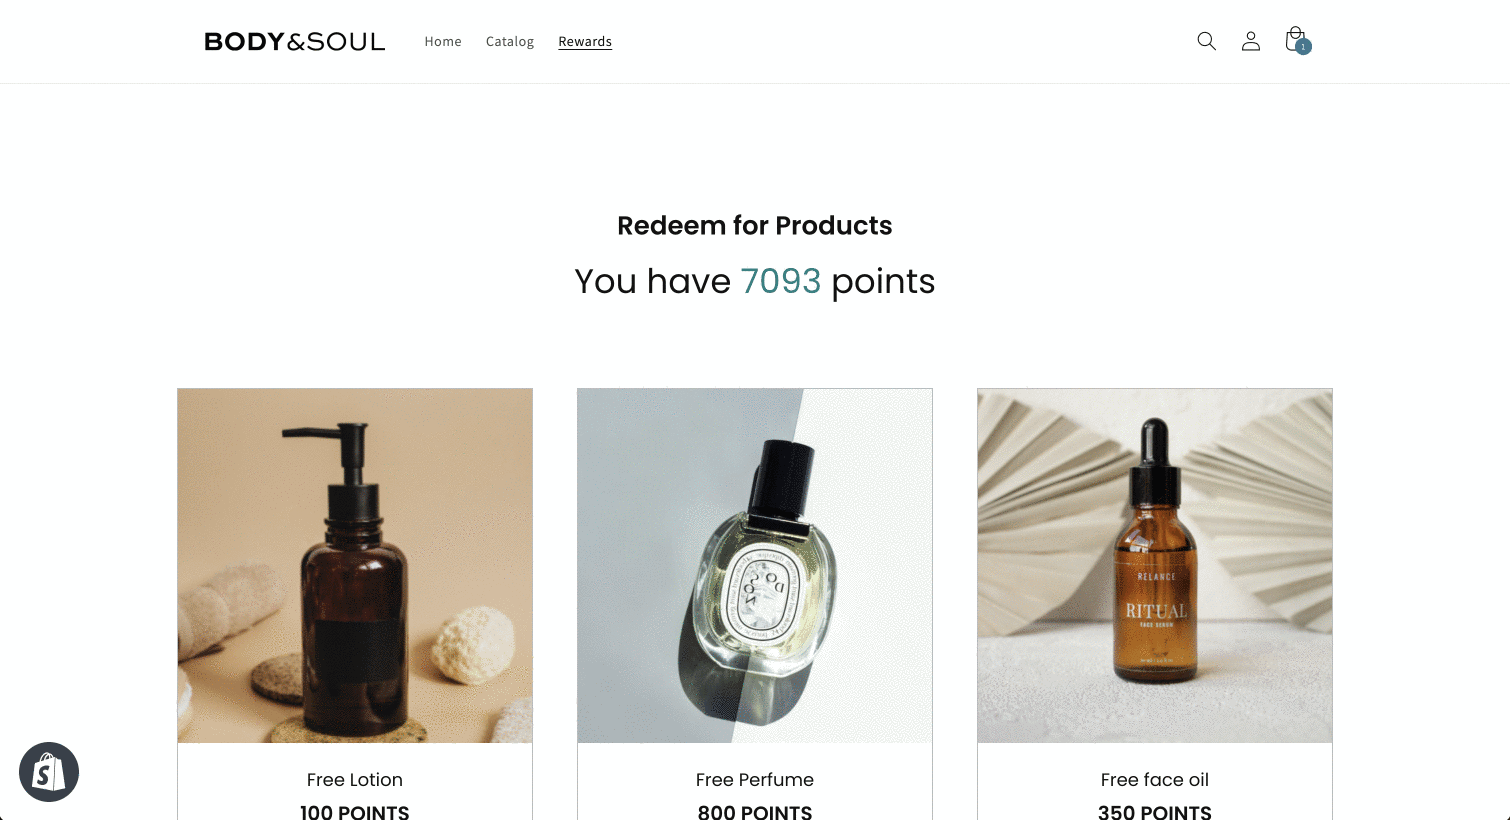
The Free Product widget is a highly customizable way to let customers redeem their points for free products. You can deploy a new widget in minutes, with no development required.
In this article, you’ll learn how to set up, customize, and add the widget to your store.
Is this article for me?
If you’re using our generic implementation, see Implementing a Free Products Widget on a Custom or Generic Platform.
How it works
The free Products widget shows customers a menu of products they can exchange for points. When they select a product, it is automatically added to their cart, and the corresponding amount of points is removed from their point balance.
Please note:
The points are deducted from the customer’s point balance only once the order is completed and Yotpo receives the order information. To learn more about how points are deducted, see Delayed Point Deduction.
Before you start
Before you can set up your Free Product widget, you need to have some free product reward options set up.
To learn how to set up free product rewards, see Offering Free Products as Rewards.
Setting up your widget
The widget can be added to your site as a section within your existing Rewards Page or as a standalone widget on any page.
Choose the relevant option for your setup:
Adding a section to your Rewards Page
To create a new section via the Rewards Page Builder, do the following:
In your Yotpo Loyalty & Referrals main menu, go to Display On-site > Rewards Page Builder.
Click Create Rewards Page or edit an existing page.
Click the Redeem Points (Free Products) section or create a new section.
Creating a standalone widget
In your Yotpo Loyalty & Referrals main menu, go to Display On-site > Redeem Points.
Scroll down to the Free Product section.
Click + Create new or edit an existing widget instance.
Customizing the widget
The widget editor includes the following sections:
Layout
Choose which products are available and the order in which they will appear on-site.
Please note:
You can only choose products for which you’ve created rewards. To create a product reward, see Offering Free Products as Rewards.
General appearance
General
Customize the fonts, text, and colors across the widget.
If you'd like to make further customizations to the widget, use the embedded CSS editor. If you need to make any overriding changes to the Free Product widget’s CSS, use this class name before the class you want to override:
.yotpo-widget-products-redemption.yotpo-widget-override-css
Important:
We strongly recommend using our embedded CSS editor If you'd like to make further customizations to the widget, instead of hardcoding directly onto your storefront.
Widgets version will automatically update unless our system detects custom CSS in the embedded editor. This is to avoid impacting the live widget version you have active on-site. If you’ve added custom CSS within the editor, you will see a notification asking you to update your widget version. Read more about widget versions.
Logged in state
This is the view a logged-in customer will see when interacting with the widget. The Points balance field must include at least one of the following variables:
{{current_point_balance}} : This shows how many points the customer currently has. For example 500 points.
{{points_as_credit}} : This shows how many points the customer has in terms of store credit. For example $5.00.
Optional restrictions
There are two optional restrictions you can choose to apply to your free products.
Per cart limit
By default, customers can redeem only one free product per cart. Uncheck this checkbox to allow customers to add multiple free products to a single cart.
Purchase requirement
By default, customers are required to have at least one paid product in the cart to redeem a free product.
To allow customers to add free products regardless of whether they include a paid product or not, uncheck the Require a paid product in the cart to redeem checkbox.
Using Shopify Plus?
If you’re using Shopify Plus, you can change this setting by going to Settings > General Settings and unchecking the Require a paid product in the cart to redeem checkbox.
Customize product appearance
Select your available product rewards and customize their appearance in the widget and any related restrictions, such as out-of-stock products.
Appearance
Choose the appearance of each individual product tile.
Product name
By default, this product name is pulled from your Free Product reward, however, you can change how it appears on the widget.
Please note:
Changing the product name in the widget will not affect the name in the catalog. If you change the name in the catalog, it will automatically update in the widget.
Product points cost:
This field must contain the {{points}} variable, which is the cost of the product as defined in the product reward. If you want to change the number of points needed to redeem the product, you’ll need to update the product reward directly. To learn how to edit the reward, see Offering Free Products as Rewards.
Product Restrictions
Set the product availability in your store and across VIP tiers.
Out-of-stock options
You can choose whether to display an “out of stock” label next to a product that isn’t currently available or hide it altogether from appearing in the widget.
This update must be done manually. Yotpo cannot detect when items are out of stock.
Restrict Product to VIP tier
Check the box if you’d like to restrict this product’s availability to certain VIP Tiers. You can choose a different tier restriction for each product individually.
Please note:
Only one label can appear in the widget. If you choose to label a product as both 'out-of-stock' and ‘VIP Only’, only the out-of-stock label will appear.
Display restricted product
If this box is checked, the product will be displayed to all customers regardless of their VIP Tier status and a "VIP Only" label will be added to the product. You can edit the text of the label. By default, this box is unchecked and the item is not restricted to any VIP tier.
Show product to logged-out customers
By default, logged-out customers cannot see products available to VIP tiers. If you to expose products that are only available to VIP tiers, select Yes.
Adding the widget to your store
Select the option relevant to your setup:
Adding a ‘Free Products’ section to your Rewards Page
To add the section to an existing Rewards Page:
In your Yotpo Loyalty & Referrals main menu, go to Display On-site > Rewards Page Builder.
Select the Rewards Page instance that has the Free Products section you’ve customized.
Click Publish in the top right corner.
The new section will be added to the existing Rewards Page instance.
Tip:
If you’re building your Free Product section in a newly created Rewards Page that hasn’t been added to your site yet, see Creating a Rewards Page.
Adding a standalone widget
To add the widget as a standalone element and not as part of your Rewards Page, you’ll need to embed specific code snippets. To learn how to embed the widget, see Embedding On-site Modules on Your Store.
Advanced customizations
Some additional customizations can be made to the widget if you are savvy with code. See below the advanced options.
The following attributes can be added to your widget's code snippet after your instance ID.
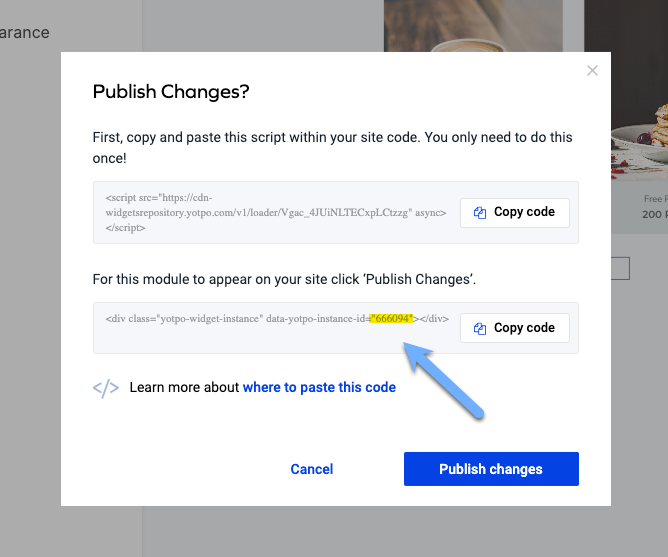
For example, if your widget's code snippet looks like this:
<div class="yotpo-widget-instance" data-yotpo-instance-id="0000"></div>
Then add the attribute here:
<div class="yotpo-widget-instance" data-yotpo-instance-id="0000" add-attribute-name=value> </div>
If you want to add multiple attributes, separate them by spaces, and add them one after the other.
Advanced attributes
Attribute | Description | Default text |
|---|---|---|
redeem-button-text="insert your own text here!" | The text for the reward redemption CTA | “REDEEM NOW” |
apply-button-text="insert your own text here!" | The text for the reward redemption confirmation | "Apply" |
dropdown-text="insert your own text here!" | The text in the dropdown menu where the customer can choose a free product from the list on the checkout page | "Choose Product" |
login-button-text="insert your own text here!" | The text for the CTA that redirects the customer to the login page in case they are logged out | "REDEEM NOW" |
point-balance-text="insert your own text here!" | The text that displays the customer’s point balance | "You have {{current_point_balance}} points" |
Confirmation-step-title="insert your own text here!" | The text that appears after the customer clicks 'redeem free product', to verify the action of redemption | “Add this item to your cart?" |
confirmation-step-confirm-option="insert your own text here!" | The text for the CTA to approve the redemption action | "YES, ADD IT" |
confirmation-step-cancel-option="insert your own text here!" | The text for the CTA to reject the redemption action | "CANCEL” |
cost-text-redemption="insert your own text here!" | The text showing the cost of the product in points | "{{points}} POINTS" |
View-cart-text="insert your own text here!" | The text for the CTA that redirects the customer to their cart | "VIEW CART" |
Go-back-text="insert your own text here!" | The text for the CTA that takes the customer back to the main state if the redemption action failed for any reason | "GO BACK" |
status-success-text="insert your own text here!" | The message that appears after a successful redemption | "Product has been successfully added to your cart" |
Status-failure-text="insert your own text here!" | The message that appears after a failed redemption | “We could not add this product to your cart" |
Has-no-paid-product-failure="insert your own text here!" | The message that appears when at least one paid product should be in the cart (only relevant if that setting is active) | "Add at least one paid product to your cart in order to redeem" |
as-free-product-failure="insert your own text here!" | The message that appears when a customer tries to redeem more than one free product (only relevant if that setting is active) | "You can only redeem one free product per purchase" |
Was this article helpful?