Importing/Exporting Points and Customers
- DarkLight
Importing/Exporting Points and Customers
- DarkLight
Article summary
Did you find this summary helpful?
Thank you for your feedback
Goals and Outcomes
Whether you're switching platforms, awarding bonus points, or updating customer information in bulk, Yotpo Loyalty & Referrals makes it easy to import and export customers and their loyalty points.
In this article, you’ll learn how to properly format your CSV file, upload customer data, and ensure a smooth import or export process no matter the size of your customer base.
Importing Customers and Points
Importing customers and point balances may be necessary when:
Migrating to Yotpo Loyalty & Referrals from another platform
Updating point balances for multiple customers
Awarding multiple customers with bonus points
Opting customers in/out of the loyalty program
Important
Making changes to customer point balances may trigger emails or other point-based programs. For example, if you've set email triggers according to point balances, updating point balances past the defined thresholds may trigger those emails. To prevent this, we recommend temporarily disabling such programs while updating point balances.
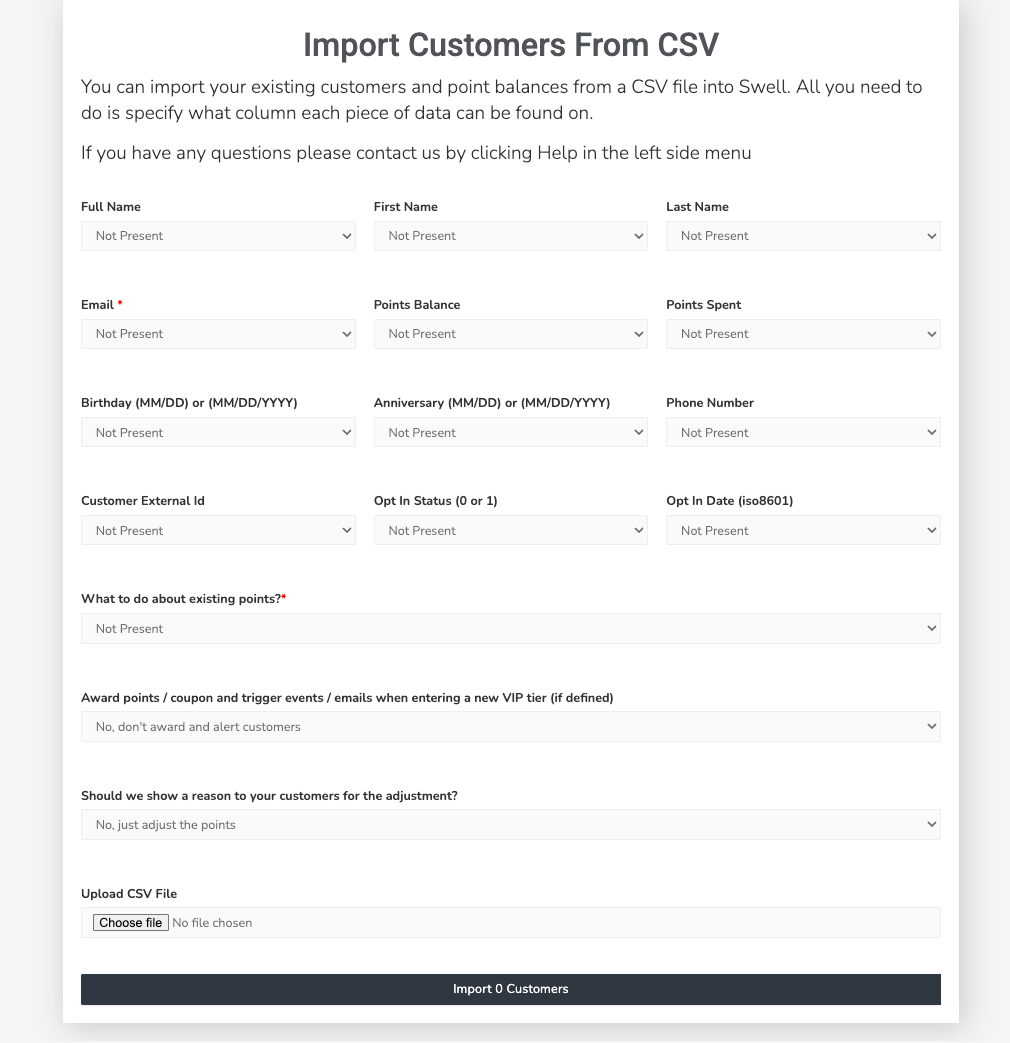
To import customers and points, log into your Yotpo account and access this page: https://loyalty-app.yotpo.com/csv-import.
Creating an Import File
Important
Your CSV import file can contain information on up to 5,000 customers. For import files containing more than 5,000 customers, please reach out to Yotpo support so we can help you with the import process.
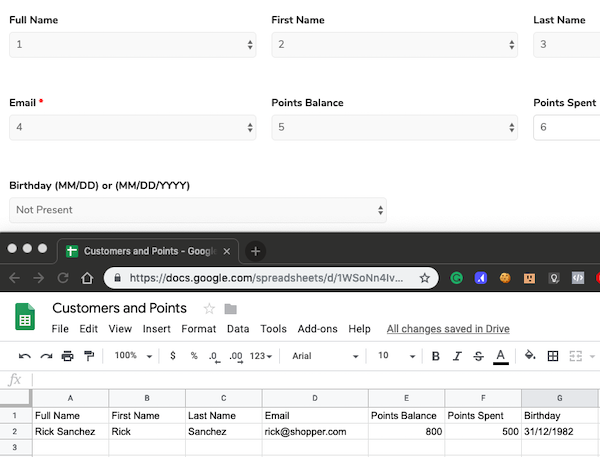
Create a CSV spreadsheet that includes the relevant columns below:
Notes
Your import file must include the customers' Email. Be sure your import CSV does not include any duplicates or empty cells. Add a cell value of 0 where you have empty cells.
Your import file should not contain more than one line related to the same email address as this may cause inconsistent point balances.
Your import file should not contain commas in any of the possible fields. For instance, make sure the email addresses only contain dots, for example - example@gmail.com and not example@gmail,com
Column Title | Optional/Required | Description |
|---|---|---|
Full Name | Optional | The customer's full name |
First Name | Optional | The customer's first name |
Last Name | Optional | The customer's last name |
Required | The customer's email address | |
Points Balance | Optional | The customer's current point balance |
Points Spent | Optional | The entire sum of spent points over the customer's lifetime |
Birthday (MM/DD) or (MM/DD/YYYY) | Optional | The customer's date of birth |
Anniversary (MM/DD) or (MM/DD/YYYY) | Optional | The customer's anniversary date for the "Customer enters the date" anniversary type |
Phone Number | Optional | The customer's phone number (used usually with omnichannel loyalty) |
Customer External ID | Optional | The customer's external ID with your platform/system |
Opt In Status | Optional | Whether the customer is opted into the loyalty program. 1 = Opt In, 0 = Opt out. |
Opt In Date | Optional | Date and time when the customer opted in. ISO 8601 |
Importing customers with the Opt In fields
Import behavior depends on the opt-in strategy set for the account. Learn more about opt-in strategies.
Opt In Strategy: Platform Account/API
Importing new customers with a blank Opt in status field: Customers will be set to "opted out." They will not earn points due to this import.
Importing existing customers that are opted out with blank Opt in status field: Customers will stay opted out and will not earn any points due to the import.
Importing existing customers that are opted in with blank Opt in status field: Customers will stay opted in and will earn points due to the import.
Importing new or existing customers with an Opt in status: Customers will be opted in according to the status set; it will override the existing status of existing customers.
Opt in Strategy: All Customers
Importing new or existing customers with blank Opt in status field: Customers will be opted in. Points will be added due to import.
Importing new or existing customers with Opt in status field set to false (0): Customers will be opted out and will not earn points due to import.
Importing Your File
To import customers and balances:
Access your Yotpo Loyalty & Referrals admin.
Enter the following URL: https://loyalty.yotpo.com/csv-import
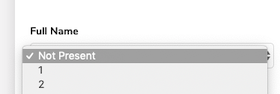
Map cells according to the import file you created in the previous section:
Select the column that corresponds with the relevant field in your import file
For example, pair column A with the number 1, column B with the number 2, etc.
Mark any irrelevant Fields as Not Present
Tip
You may include additional columns for Notes, Reason for Points Adjustment, etc. You can choose whether to communicate this information to customers later in the import process.
Point Adjustments
If necessary, you can make adjustments to existing points.
Calculating spent points from lifetime points
To calculate Spent Points (points spent by the customer that are no longer available) simply deduct the customer's current Point Balance from the customer's lifetime points (the total number of points accrued over the entire customer lifecycle).
For example, if the customer's lifetime points are 950 points, and their point balance is 450 points, then the spent points are 500.
Existing points

You may Replace existing points with new points or Add existing points to the new points. If you are not importing points, please choose the Add existing points option.
Replacing existing points with new points should only be done when launching a new program or re-starting a program.
Important
Choosing to replace the existing points with the new imported points will result in deleting the entire earning history of this customer.
We recommend exporting customers before making any such adjustments. See more about exporting customers.
Awarding Customers for Earning a Tier

This option allows you to choose whether to award customers with their VIP tier entry reward if the points import resulted in the customer earning the next tier.
We recommend using the option to Yes, award and alert customers when importing bonus points, and the No, don't award and alert customers when using the import as part of a pre-launch migration, or when fixing data.
Communicating Point Adjustments to Customers
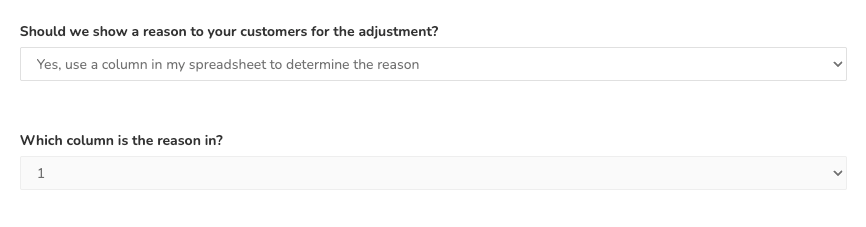
If necessary, you may communicate the reason for a point adjustment to your customers. This can be done by creating an additional column in your import form and including the adjustment reason for every customer, or you may provide one collective reason applicable to all customers.
If you select Use a column in my spreadsheet to determine the reason, make sure to map the column number in the relevant field. If you've selected Use the same reason for every customer, make sure to provide the reason in the relevant field.
Importing points with each setting will be reflected in the customers' accounts as follows:
No, just adjust the points: This will import the point adjustments as not visible, and the reason in the customers' profiles will say "Replace by CSV" or "Adjustment from CSV" according to the setting set in Existing Points.
Yes, use a column in my spreadsheet to determine the reason / Yes, use the same reason for every customer: This will import the points as visible, and the reason in the customers' profiles will be the one indicated in the provided reason method.
Note
It is not possible to import the reason with commas, regardless of how the reason is provided
Submitting Your Import File
Once you've verified that your import file is complete and does not contain any duplicates or blank cells, click Choose File, select the relevant file, and then click the Import button at the bottom of the page.
Important
Depending on the volume of the import, it may take anywhere from 1 minute to 24 hours for the import to complete. To ensure a successful import process, be sure to allow at least one hour before deactivating any point-based programs after submitting your import file.
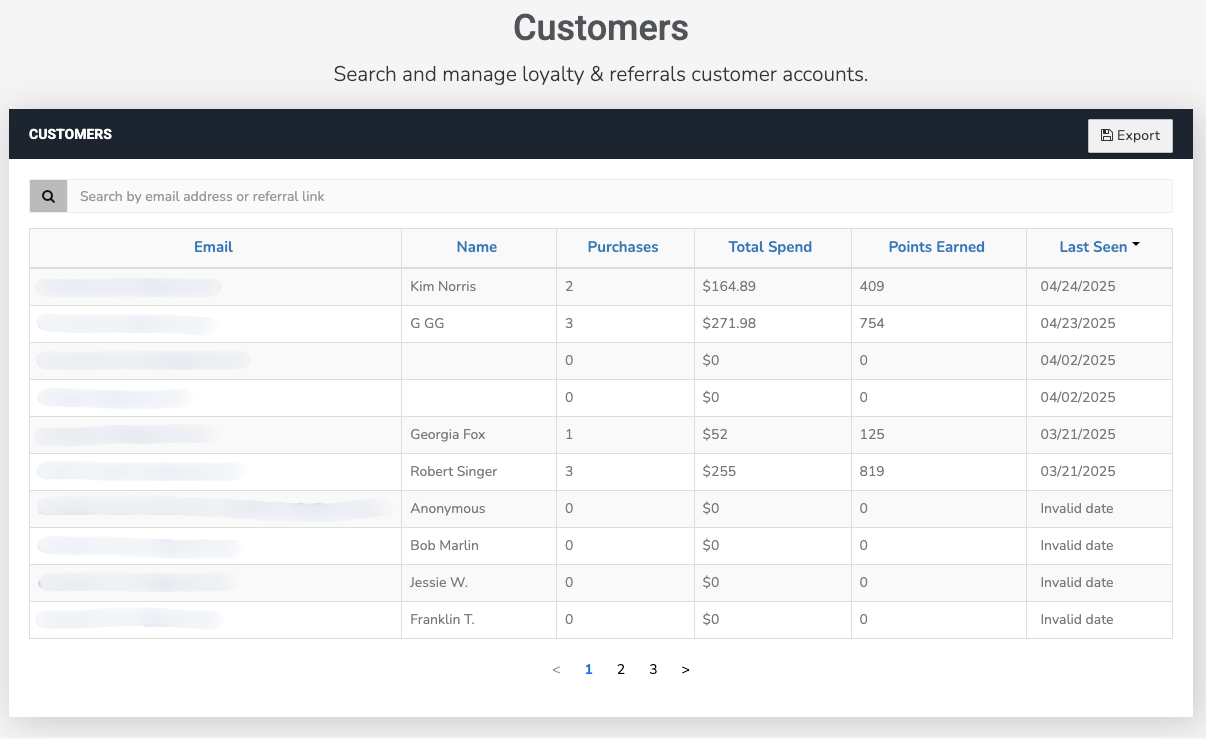
Exporting Customers
When accessing the Customers section, you will see a list of all of your customers. Click the Export button at the top right corner of the screen to export customer information.
Once you click the button, you'll see the following window which allows you to choose what you'd like to export:
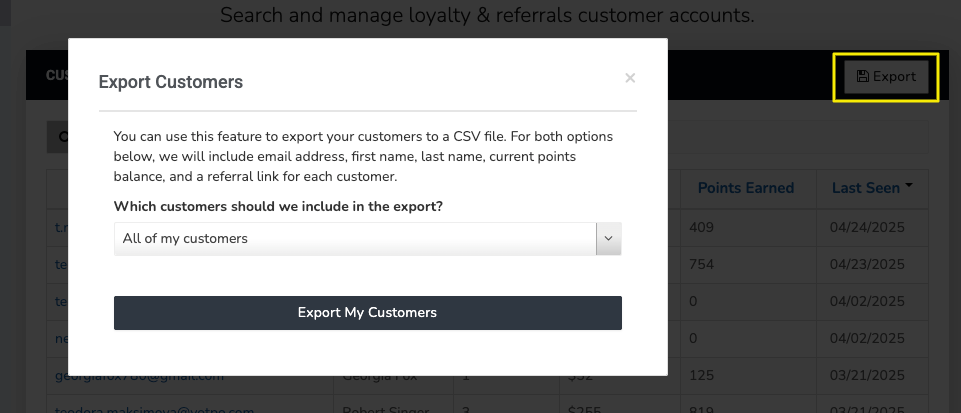
All customers
Only customers captured with the newsletter signup popup
Only customers captured with the Coming Soon module
Was this article helpful?