Integrating Yotpo Loyalty & Referrals with Salesforce Marketing Cloud
- DarkLight
Integrating Yotpo Loyalty & Referrals with Salesforce Marketing Cloud
- DarkLight
Article summary
Did you find this summary helpful?
Thank you for your feedback

If you use Salesforce Marketing Cloud (SFMC) to send marketing emails to your customers, you can use Yotpo's Salesforce Marketing Cloud integration to automatically sync program-related data with your Marketing Cloud account!
Sending rewards and referral program-related emails directly from Salesforce Marketing Cloud makes it easier to manage your Journeys and Campaigns, ensure that customers receive the right email at the right time, and better target customers based on their program status.
Using multiple business units?
- This integration requires a B2C Commerce Cloud.
- Currently, Yotpo Loyalty & Referrals can only support one business unit in Salesforce Marketing Cloud.
Integrating Yotpo and Salesforce Marketing Cloud
To get started:
- Head to our Yotpo Loyalty for Marketing Cloud AppExchange listing.
- Click Get it Now, and sign in to install the package.
- Next, log in to your Yotpo Loyalty & Referrals admin.
- Click Integrations.
- Select Salesforce Marketing Cloud from the integrations dropdown menu:
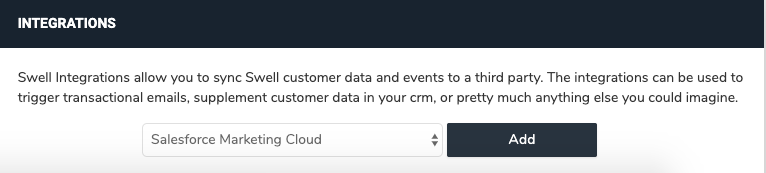
- Click Add.
- You'll be asked to log into your Salesforce Marketing Cloud account. Once you do, Yotpo will begin syncing Yotpo Events and Yotpo Customer Attributes into new Data Extensions in Salesforce Marketing Cloud:
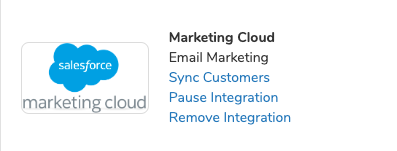 Important Information About Authentication with Salesforce Marketing Cloud:Yotpo will continue to send events & customer attributes to Salesforce Marketing Cloud as long as your password from the moment you added the integration remains the same. If you ever change your Salesforce Marketing Cloud password, you'll need to come back here and re-add the Salesforce Marketing Cloud integration
 - After the sync is complete, head to the Contact Builder in Marketing Cloud by hovering over Audience Builder.
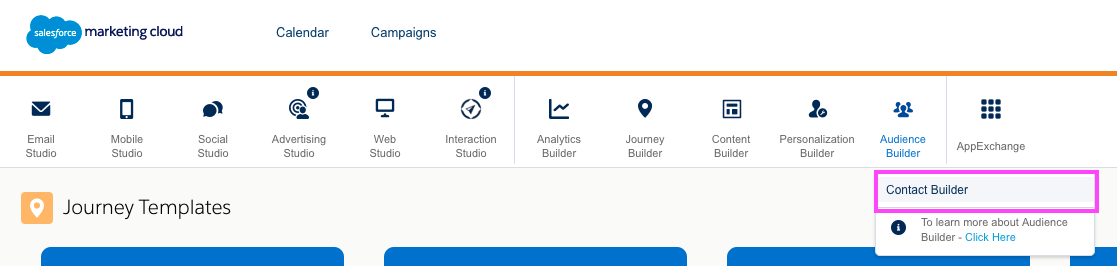
- Select the Email Data bubble and click Ok to continue.
- In the top-right of the screen, click the drop down next to Data Extension and select Link.

- Expand the "Data Extensions" folder and select double-click on SwellCustomerAttributes.
- From the "Customer Data" box, select the Email Address key and match it to the corresponding email_address key within the "SwellCustomerAttributes" box (towards scroll to the bottom).
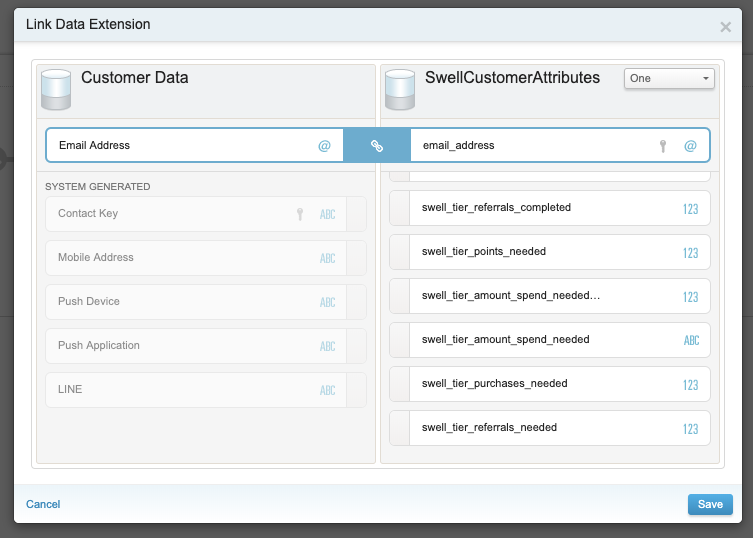
- Click Save.


You're all set! Your SwellCustomerAttributes are now linked to your Marketing Cloud Contact Data via Email Address 
What's Going to Show Up in My Marketing Cloud Account?
In general, there are two sets of data that Yotpo passes into Salesforce Marketing Cloud Data Extensions:
Yotpo contact data & definitions
1. Contact Data - This is any pertinent Yotpo data about the customer (e.g. point balance, unique referral link, etc.). Each time it updates (for example, if a customer earns more points), Yotpo will automatically update it in Salesforce Marketing Cloud as well. This data can be used as personalization strings in your Marketing Cloud emails.
Yotpo Contact Data & Definitions
- swell_point_balance | The customer current available points balance
- swell_credit_balance | If a variable coupon is present, this will equal the dollar value the customer's points equate too based on the logic set in the variable coupon
- swell_points_earned | The customer's total historical points earned
- swell_referral_link | The customer's unique referral link
- swell_referral_discount_code | The customer's unique referral code (DZENI123)
- swell_has_account | True/False depending on if the customer has an account with the platform or not
- swell_first_name | The first name of the customer, only will populate if the customer has an account with the eCommerce platform
- swell_last_name | The last name of the customer, only will populate if the customer has an account with the eCommerce platform
- swell_name | The full name of the customer (first name + last name), only available if provided by the platform
- swell_tier_points_earned | The reward, in points, the customer earned for entering the most current tier
- swell_tier_points_needed | For points-based tiers, the number of points needed to advance to the next tier
- swell_tier_amount_spent | For spend-based tiers, the total "amount spend" this customer has with the client's store
- swell_tier_amount_spent_cents | For spend-based tiers, this is the total amount currently spent at the client's store, in cents (typically used for converting to other currencies, if needed, in ESP)
- swell_tier_amount_spend_needed | For spend-based tiers, the amount spend needed in order to reach the next tier
- swell_tier_amount_spend_needed_cents | For spend-based tiers, the amount spend needed in order to reach the next tier, in cents (typically used for converting to other currencies, if needed, in ESP)
- swell_tier_purchases_made | For # of purchases-based tiers, this will be the number of current purchases the customer has made
- swell_tier_purchases_needed | For # of purchases-based tiers, this will be the number of purchases needed to advance to the next tier
- swell_tier_referrals_completed | For referral-based tiers, this will be the total number of referrals this customer has completed
- swell_tier_referrals_needed | For referral-based tiers, this will be the number of successful referrals needed to advance to the next tier
- swell_vip_tier_name |The name of the current tier that the customer is on. Pulls from the name field when adding/editing a VIP Tier
- swell_tier_multiplier | The value of the tier multiplier in the tier the customer is currently in. This pulls from the "Point Earning Multiplier" field when adding/customizing a VIP Tier
- swell_tier_reward_points | If VIP Tier is set to award points, the number of points being awarded will populate here. This pulls from the "Award Points" field when adding/customizing a tier
- swell_tier_redemption_option_name | If VIP Tier is set to award a coupon, the name of the coupon will populate here. This pulls from the "Award a Coupon" field when adding/customizing a VIP tier
- swell_next_tier_name | The name of the next tier available after the customer's existing tier.
- swell_next_tier_multiplier | The value of the tier multiplier in the next tier the customer can achieve. This pulls from the Point Earning Multiplier field when adding/customizing a VIP Tier
- swell_next_tier_reward_points | If VIP Tier is set to award points, the number of points being awarded in the next tier up will populate here. This pulls from the Award Points field when adding/customizing a tier
- swell_next_tier_redemption_option_name | If VIP Tier is set to award a coupon, the name of the coupon you would receive in the next tier will populate here. This pulls from "Award a Coupon" field when adding/customizing a VIP tier
- swell_vip_tier_ends_at | The date this customer's eligibility for the tier ends. Almost customer's date will be unique depending on when they entered the tier and what the "Tier Earning Period" is
- swell_birth_month | The month the customer was born. This is captured via the "Happy Birthday" campaign or via API
- swell_birth_day | The day the customer was born. This is captured via the "Happy Birthday" campaign or via API
- swell_birth_year | The year the customer was born. This is captured via the "Happy Birthday" campaign or via API
- swell_points_expire_at | The date a customer's points expire. Use this data to remind them a number of days before the points expire
- LOYAL_ANNM | The month of the customer's anniversary. This is captured via the anniversary earning rule or via API.
- LOYAL_ANND | The day of the customer's anniversary. This is captured via the anniversary earning rule or via API.
- LOYAL_ANNY | The year of the customer's anniversary. This is captured via the anniversary earning rule or via API.

API events data
2. APIEvents Data - These are one-time occurrences that you can use to trigger Journeys. For example, you can set the "Swell Redemption Reminder" event to send when a customer has enough points to redeem for a discount but hasn't redeemed points in their balance for a certain period of time (which we've found is extremely helpful in getting them to come back and shop).
Yotpo Events
- Swell Account Created
- Swell Customer Birthday
- Swell Birthday Captured
- Swell Customer Anniversary
- Swell Newsletter Signup
- Swell Points Earned
- Swell Points Reminder
- Swell Redemption Created
- Swell Redemption Reminder
- Swell Referral Completed
- Swell Referral Share
- Swell Referral Share Reminder
- Swell Referral Discount Code Updated
- Swell Tier Earned
- Swell Tier Lost

Which emails do you recommend setting up in my Marketing Cloud account?
Using a combination of your contact and events data, there is an incredibly wide variety of emails you can send using the Yotpo-Salesforce Marketing Cloud integration.
This section describes some of the most popular emails we recommend sending, and includes the appropriate personalization strings you'll need to place the appropriate program data in each email.
Program-related emails
Want to send customers an email with their referral link? Or include their up-to-the-minute point balance? No problem!
Encourage customers to share their referral link
We highly encourage you to send an email to your customers with their unique referral link. Upon receiving your email, they can forward it directly along to all of their friends, and hopefully earn you tons of referral-based business in the process
Wherever you'd like to include the customer's unique referral link in your email, just insert this personalization string:
%%swell_referral_link%%
Update customers on their point balance
In almost any of your emails, it's never a bad idea to update your customers on their point balance! Better yet, all it takes is including this personalization in your email:
%%swell_point_balance%%
Syntax Warning
The syntax examples above
(%%text_here%%) can only be used in regular marketing emails & Journeys in Salesforce Marketing Cloud. If you want to include a customer attribute in an API Event-Triggered Journey, see the below section for more detailAPI event triggered journeys
Instead of sending emails to customers via Yotpo when they complete program-related "events", you can send them directly via Salesforce Marketing Cloud instead!
Data created by Yotpo program events will be stored within Sendable Data Extensions in Salesforce Marketing cloud. You'll be able to access this data and send real-time emails to your customers about their loyalty & referral engagement by building out API Event-triggered Journeys in your Marketing Cloud account.
Syntax: Include customer attributes in API-event journey
In order to include the customer attributes that we synced over in the SwellCustomerAttributes Data Extension, we will have to use the LookUp Function with Salesforce Marketing Cloud to populate pull this data from the SwellCustomerAttributes Data Extension and include it in the Data Extension you're sending.
Use this lookup function when you want to include an attribute from the SwellCustomerAttributes Data Extension in an API-Event Triggered Email.
Simply sub out the column_name_here parameter (ordinal 2) with the column name from the SwellCustomersAttributes Data extension that you'd like to populate:
%%=Lookup('SwellCustomerAttributes','column_name_here','email_address',swell_referrer_email)=%%
Syntax: Include event attributes in an API-event journey
Utilizing the attributes that are sent over with the API Event/Data Extension is as simple as including customer attributes in a regular Salesforce Marketing Cloud email!
Simply replace event_attribute_here to include the column name that you'd like to populate from the Event Data Extension:
%%event_attribute_here%%
Creating a journey
To get started:
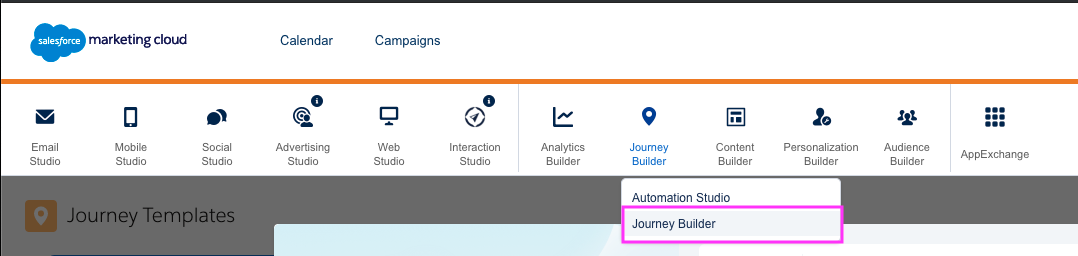
- Head to the Journey Builder section of your Marketing Cloud admin
- Click on Create A New Journey and select "Create a New Journey From Scratch".
- Immediately rename your Journeyafter the Swell Event you are building this journey off of by clicking on the pencil icon at the top of the Journey builder
- In this example we'll build a "Referral Share" Journey
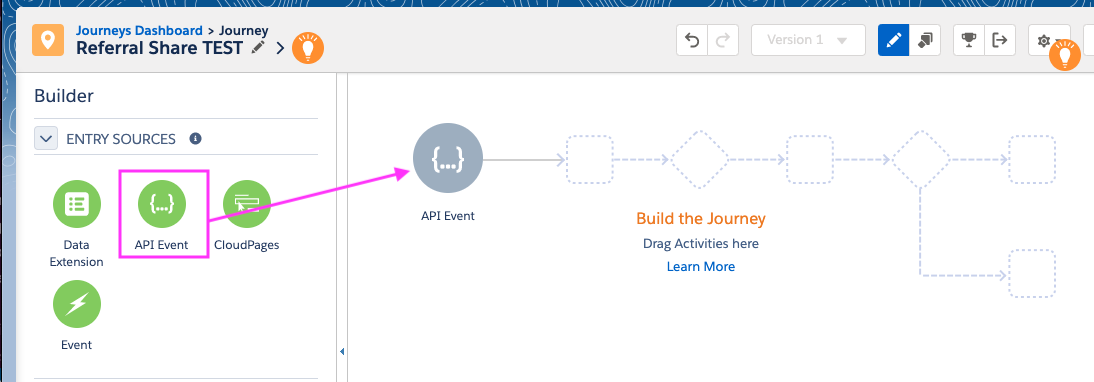
- Drag & drop API Event into the "Entry Source" within the Journey Flow:
- Click on the API Event within the Journey and a list of events will pop out from the left-hand side. Select the Swell event you're using to trigger this Journey and click Done.
- In this example, we will select the swell/referral/share event
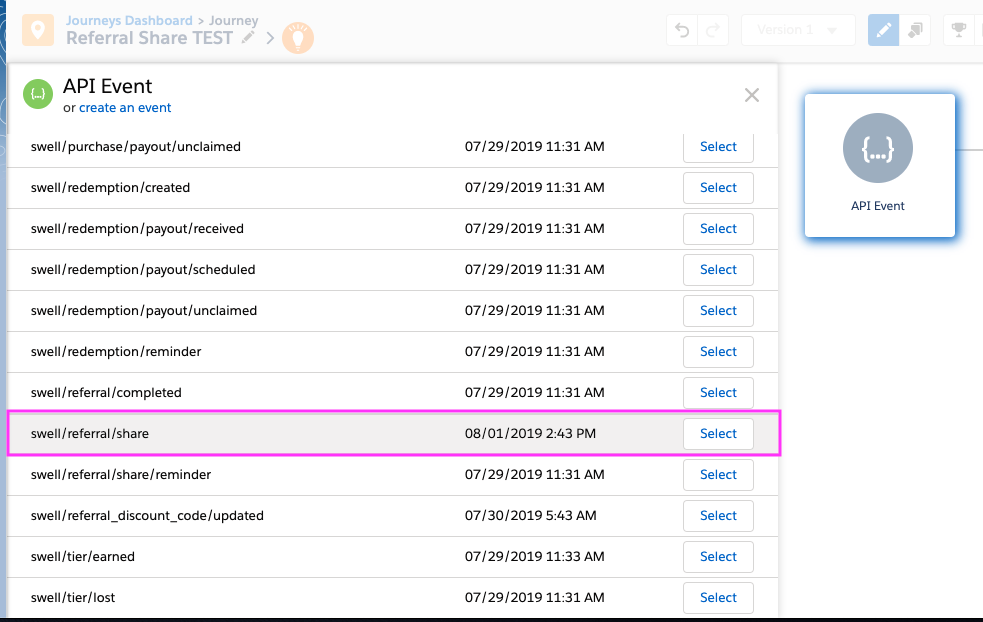
- In this example, we will select the swell/referral/share event
- Next, drag & drop an Email component as a next step in the Journey builder:
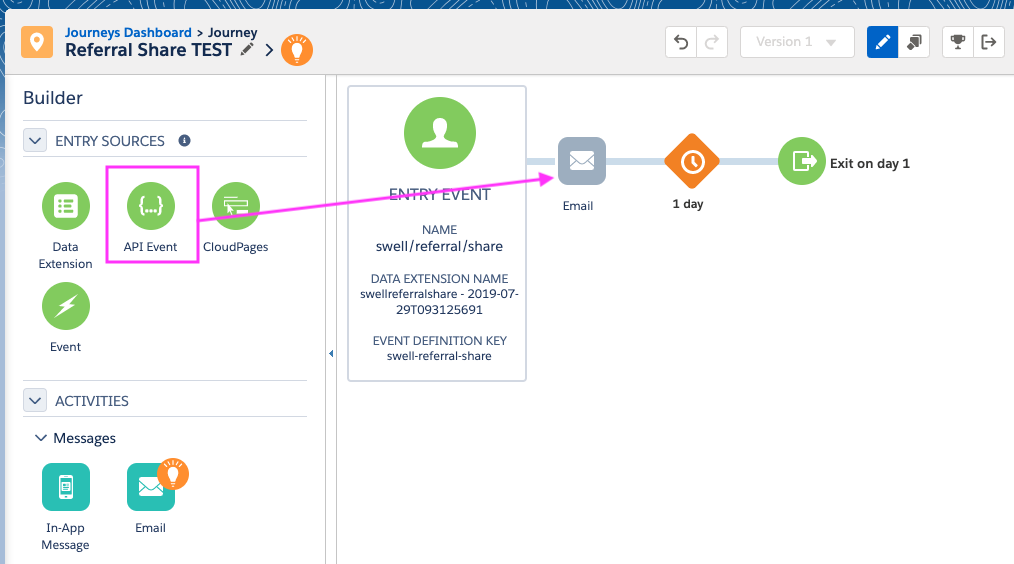
- Click on the Email component to expand the Activity Summary.
- SelectMessage you already created or create a New Messagethat will be triggered when someone enters this Journey.
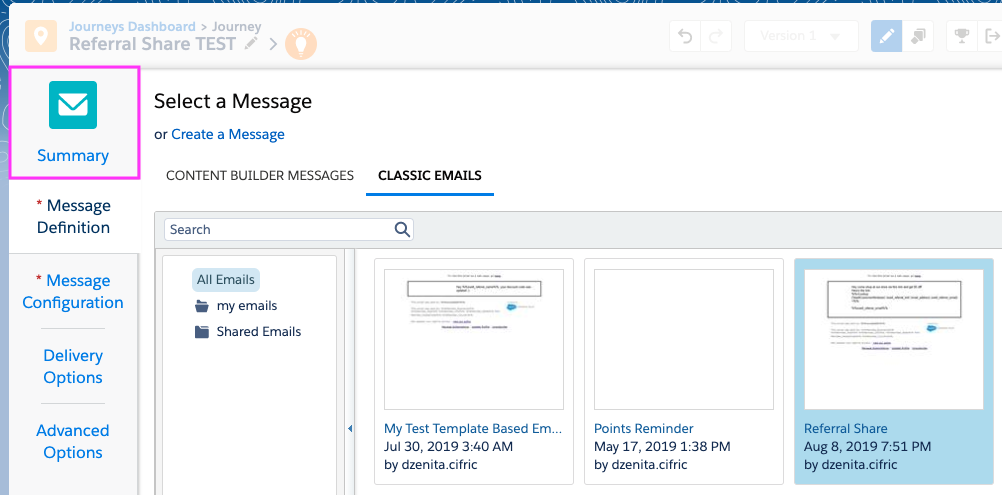
- In this example, we will Select Message, click on Classic Emails and select the "Referral Share" email we previously created where we used the LookUp function to pull in the swell_referral_link from the SwellCustomerAttributes Data Extension
- Function included:
%%=Lookup('SwellCustomerAttributes','swell_referral_link','email_address',swell_referrer_email)=%%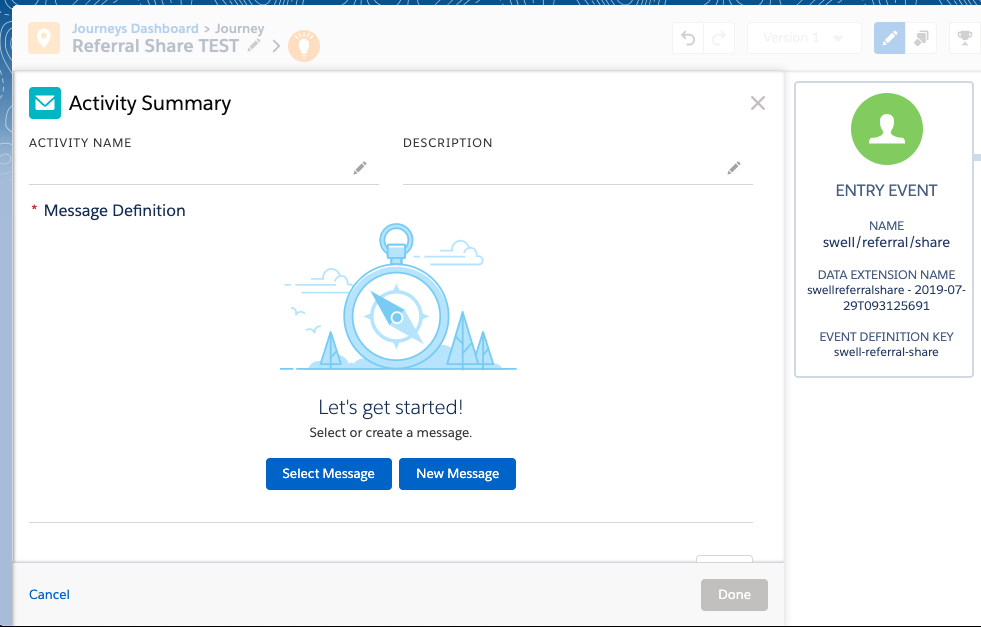
- After you've selected or created your message, feel free to adjust any of the Message Configuration, Delivery Options, or Advanced Options as you see fit.
- Once you're all set, click back to the Summary section and click on Done.
- Once you're all set, click on Activate to validate & activate your Journey.


You'll want to repeat the above steps for every Swell Event that you want to trigger in Salesforce Marketing Cloud.
Preview and test your journey
You can use the Test and Preview action in SFMC to make sure the journey is set up correctly and preview your emails:

- Click the Preview & Test section of your SFMC admin.
- Click the folder icon to find the data of a customer to fill in the customer attributes in the email.
- Once the data is populated, send yourself a test email.
Was this article helpful?