Adding Yotpo Reviews Highlights to Klaviyo Emails
- DarkLight
Adding Yotpo Reviews Highlights to Klaviyo Emails
- DarkLight
Article summary
Did you find this summary helpful?
Thank you for your feedback
Yotpo's integration with Klaviyo leverages an advanced AI algorithm to empower mutual Yotpo <> Klaviyo customers with the social proof of top customer testimonials. Yotpo's algorithm identifies your best reviews and leverages smart sentiment analysis to automatically extract the best and most insightful sentences with the highest potential to convert. Once integrated, top highlights from reviews are showcased in an eye-catching in-mail widget embedded in your Klaviyo email templates. In this article, you'll learn how to set up the integration between Yotpo Reviews and Klaviyo.
How it works
Reach the right people with the right content by using UGC data to create more targeted and effective email campaigns enriched with AI-powered highlights from your best reviews!
Using sentiment analysis, Yotpo continuously scans each verified review, breaks it into individual sentences, and identifies the most positive highlights from your very best product reviews.
Top sentences are automatically selected according to their positive sentiment, number of topics mentioned, and their recency.
Before you start
Make sure your Yotpo account and Klaviyo account are connected. To learn how to connect the two accounts, click here.
In order to take advantage of our AI algorithm, your Yotpo account must be set to English
Smart Sentiment Analysis and Review Highlights will only work for reviews in English
Verified reviews must carry the verified buyer or the verified reviewer badge
Reviews that were imported into Yotpo are not eligible to appear in Review Highlights
Integrating Yotpo and Klaviyo
Integrating Yotpo and Klaviyo is super easy! Just set up your Klaviyo Data Feed, add Yotpo's code to your Klaviyo email template, and you're set! Once the accounts are connected, Klaviyo will pull all relevant data that currently exists in your Yotpo account:
Reviews scores
Review count
etc
This information will be constantly updated according to the account activity.
Review Highlights - Topics
Once your Yotpo and Klaviyo accounts are connected, choose up to 10 topics to promote in your Klaviyo emails. Yotpo's algorithm will automatically prioritize Review Highlights associated with these topics.
For example, choosing topics such as Scent, Color, Fragrance, and Smell will prioritize Review Highlights associated with these topics.
Review Highlights - Products
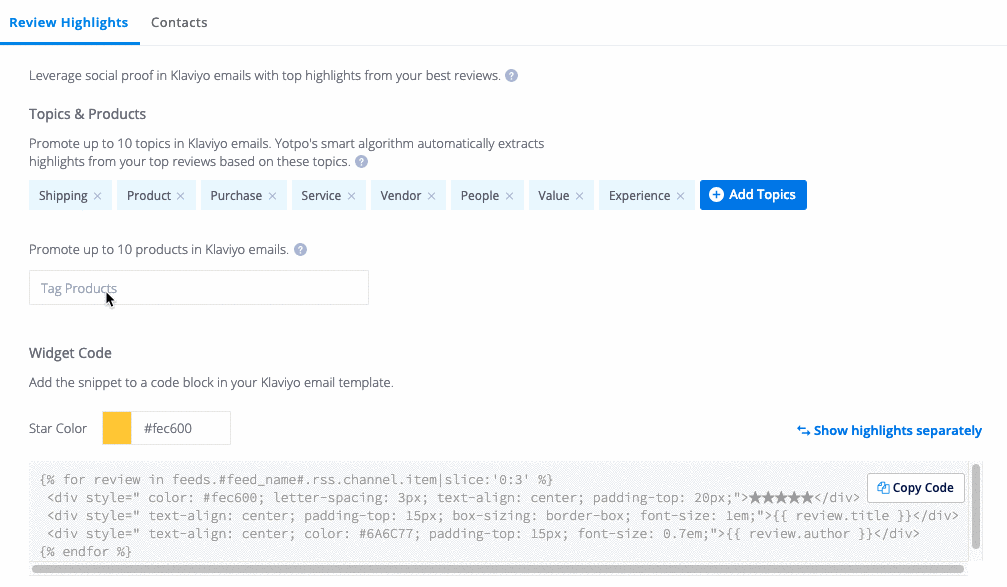
Select up to 10 products to promote in your Klaviyo emails. These products are combined with the topics defined in the section above. For example, selecting topics such as Quality, Size, Fit, etc. will apply to the products selected.
Please note:
If one or more of your selected products does not have sufficient content for Yotpo's algorithm to successfully extract Review Highlights, highlights from different products based on your selected topics may be displayed instead.
For example, if you defined "Fabric" as one of your topics and selected "V-Neck T-Shirt" as a promoted product, Review Highlights associated with the "Fabric" topic may be extracted from reviews on a different product in your catalog.
Displaying Review Highlights in Klaviyo
Once you've configured your topics and products, you'll need to connect your Yotpo data feed to Klaviyo, set up a Klaviyo campaign, and add Yotpo's code to your Klaviyo email template.
Configuring your data feed
In your Klaviyo account, go to Settings > Web Feeds.
Click Add Web Feed.
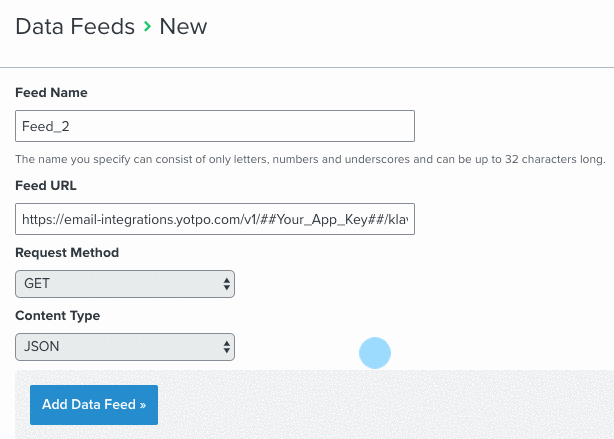
Name your feed in the Feed Name field. We recommend calling the feed YotpoReviews. You will need to use the feed name when setting up your campaign.
Copy the URL below and paste it into the Feed URL field:
https://email-integrations.yotpo.com/v1/:app_key/klaviyo/reviews_highlights.jsonImportant:
In the Feed URL field, replace the :app_key URL parameter with the value of your Yotpo app key.

To learn how to find your Yotpo app key, click here.
Set the Request Method as GET.
Set the Content Type as JSON.7. Click Add Data Feed.
You will now see the feed as part of the Web Feeds you have set up in your Klaviyo account.
Adding Review Highlights to your template
To include Yotpo's Review Highlights within your email template:
In the Yotpo Reviews main menu, go to Integrations > Klaviyo.
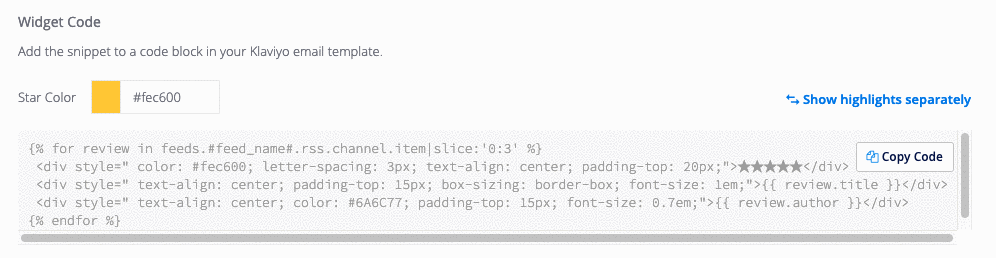
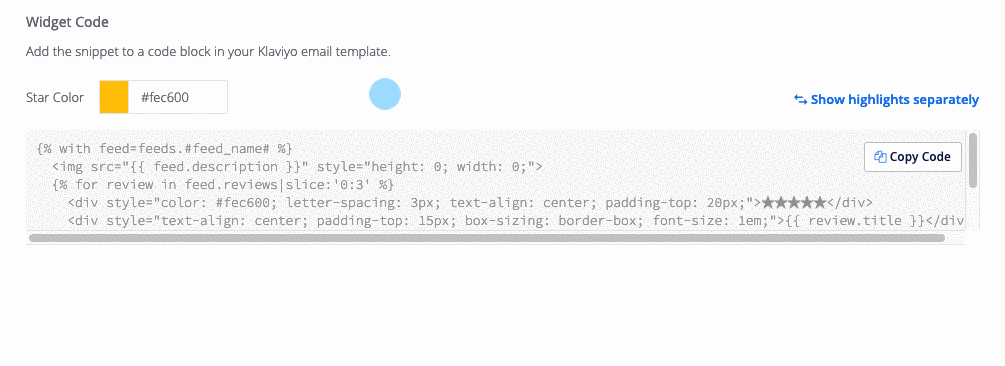
Copy the code snippet generated at the bottom of the page.
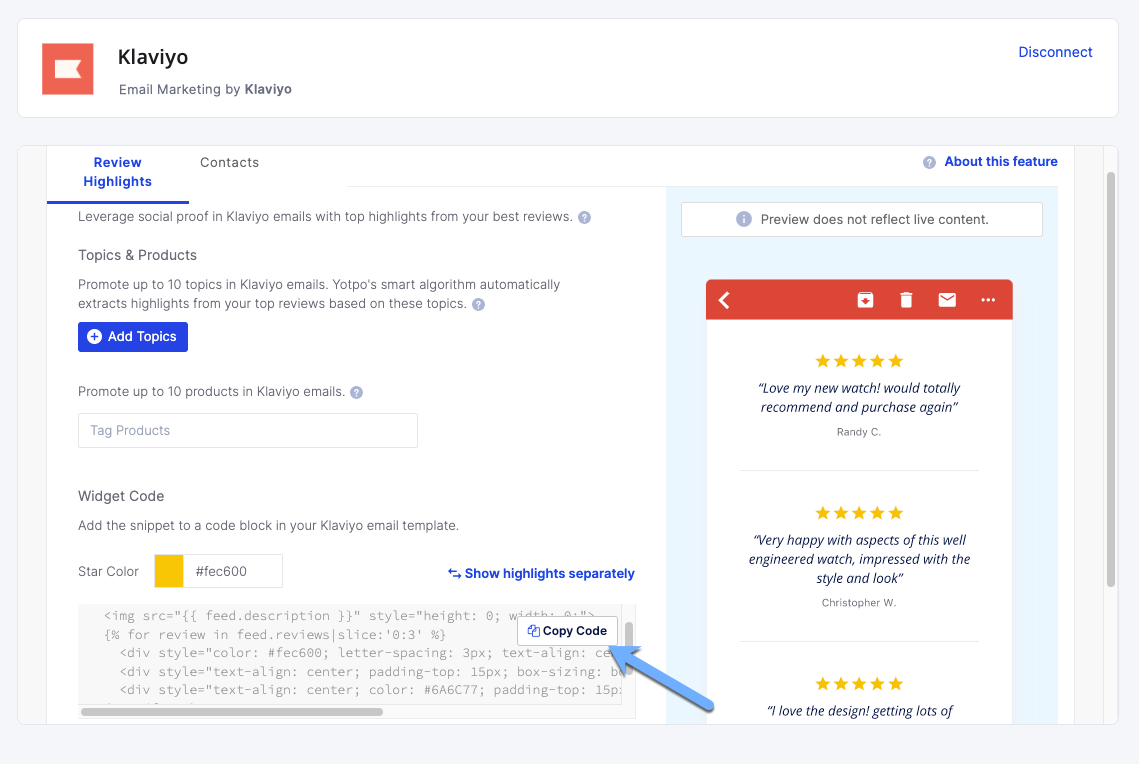
Choose how you to show the highlights in the email:
To show review highlights as a single block of three highlights, copy the bulk snippets code.
To show review highlights as individual highlights click Show highlights separately copy each snippet, and paste it into the desired location within your Klaviyo template.
Go back to the email campaign you're creating in Klaviyo and select a Text block element.
Choose the Source code option and add the code you've copied from Yotpo.
In line 1 of the snippet, replace #feed_name# with the exact data feed name defined in Step 3 of the Configuring Your Data Feed section above. This title is only used to associate your data feed and won't appear anywhere in your emails.
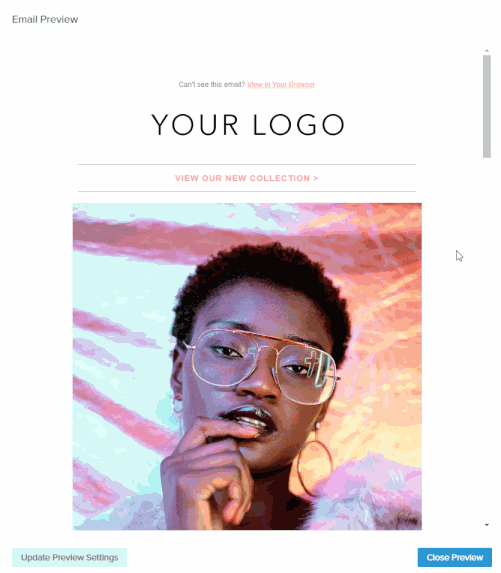
Click Preview and Test to see what the Review Highlights will look like in the email template you're using.
Tip:
By default, the snippet will display 3 review highlights. You may display up to 10 highlights by modifying the slice:':3' %} parameter. For example, slice:':10' %} will show 10 highlights and slice:':1' %} will display a single review highlight.
Adding Product or Topic Specific Review Highlights to Campaigns
Assuming you've already set up and launched your first Klaviyo campaign with Yotpo's Review Highlights, you'll need to follow the steps below to set up product or topic-specific Klaviyo campaigns.
Important:
Once a feed is created and used, the reviews will be cached (stored) for 24 hours, regardless of any changes made to the URL parameter(s).
First Feed Request (Cache is Empty): Our system saves the response data (based on your feed parameters) in the cache for 24 hours.
During 24 Hours: All requests (feeds), even with different parameters, will return the same cached data.
After 24 Hours: The cache clears, and a new request (feed) will save fresh data for the next 24 hours.
It is not possible to run multiple campaigns with different Review Highlight results simultaneously during the 24-hour cache period, as each feed will return the same cached results.
Create and configure a new Data Feed:
In your Klaviyo account, go to Settings > Web Feeds.
Click Add Web Feed.
Enter a new and unique name in the Feed Name field. This name should be different from the name of your existing data feed(s).
This name can consist of only alphanumeric characters and underscores and can be up to 32 characters long.
Retrieve your Yotpo App Key.
Copy the URL below and paste it into the Feed URL field.
https://email-integrations.yotpo.com/v1/:app_key/klaviyo/reviews_highlights.json
In the Feed URL field, replace the :app_key URL parameter with the value of your Yotpo app key.
For example:
To display Review Highlights for specific topics, add the following URL parameter(s) to your data feed URL:
Single topic (price): ?topics[]=price
Multiple topics (price, quality, color): ?topics[]=price&topics[]=quality&topics[]=color
To surface Review Highlights for certain products, add the following URL parameters(s) to your data feed URL:
Single product: ?product_ids[]=#product_id_value#
Multiple products (up to 10):
?product_ids[]=#product_id_value#&product_ids[]=#product_id_value#Each additional product should be added with an ampersand (&)
For example, the following string includes 7 different products:
?product_ids[]=123456&product_ids[]=54321&product_ids[]=7896&product_ids[]=45325&product_ids[]=76567&product_ids[]=39576&product_ids[]=4567435
A complete data feed URL with topics and products defined should look like something this:
https://email-integrations.yotpo.com/v1/##Your_App_Key##/klaviyo/reviews_highlights.json?topics[]=price&topics[]=quality&topics[]=color&product_ids[]=15432&product_ids[]=67345&product_ids[]=344243&product_ids[]=3453&product_ids[]=5676&product_ids[]=64523&product_ids[]=745345Once you've queried the relevant topics and/or product IDs, copy and paste the data feed URL in the Feed URL field:
Set the Request Method as GET.
Set the Content Type as JSON.
Don't forget to click
 when you're done.
Click Campaigns and proceed to Step 2 Message Content.
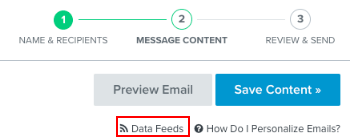
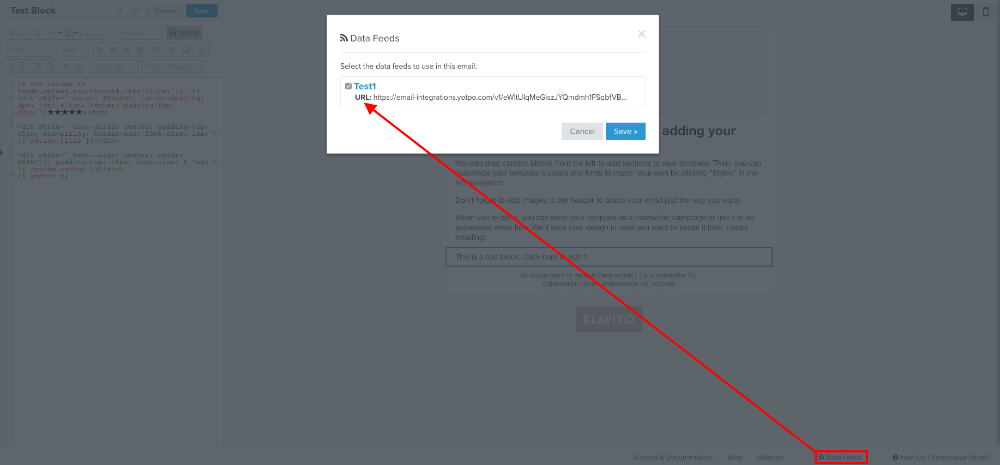
Click Edit Content and then click Data Feeds.
Check the box adjacent to the data feed you configured for this campaign and click Save
Adding Review Highlights to your template (multiple campaigns)
Once you've configured you additional data feed(s), you'll need to add the widget component to your Klaviyo email template:
Log into Yotpo.
Click Integrations > Klaviyo.
Copy the widget code from the bottom of the page.
To show review highlights as a single block of three highlights, copy the bulk snippets code. To show review highlights as individual highlights click Show highlights separately, and copy each snippet individually.
Tip: Customize the Star Color using the color picker
In Klaviyo > Campaigns, click Create Campaign or edit an existing one.
Drag and text block to your template.
Click Source and add Yotpo's widget code.
Change the #feed_name#parameter so it identically matches the name of your new data feed. If you choose to display highlights separately, make sure to update the feed name of each snippet.
Next, click Data Feeds at the bottom of the page and select the relevant Data Feed.
Mark the checkbox of the relevant Data Feed and click Save.
Preview your template in Klaviyo's live preview pane and click Save Content when you're done.
Review your campaign, click Review & Send Campaign and you're all set!
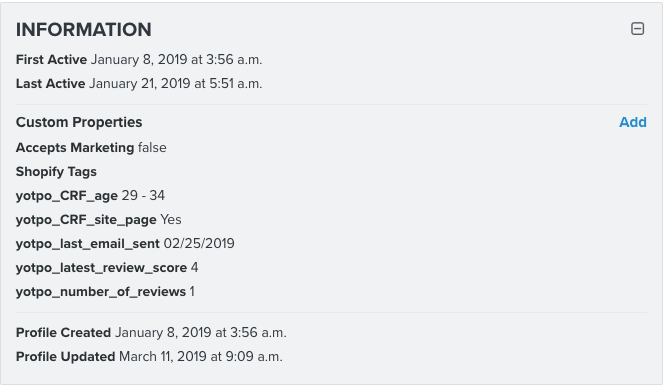
Syncing contacts
Once you've authorized Yotpo's Klaviyo App, mutual contacts are updated with reviewer data from Yotpo, allowing you to segment your lists and create targeted campaigns according to responses to Custom Questions, Latest Review Score, and the total number of reviews created by the reviewer.
Field | Description |
|---|---|
Latest Review Score | Last known star-rating score submitted by the reviewer |
Number of Reviews | The total number of Yotpo reviews created by this contact |
Custom Questions responses | Responses to custom questions submitted along with the review |
To view Yotpo data in your Klaviyo contacts:
Log in to Klaviyo.
Click Profiles.
Your Yotpo review data will appear in the Information pane on the right.
Please note:
Any unpublished reviews that were created before you integrated Yotpo and Klaviyo will not be included in the sync.
Uninstalling Yotpo's Klaviyo Integration
Yotpo's Klaviyo integration can be easily uninstalled by going to Integrations > Klaviyo and clicking Disconnect in the upper right-hand corner of the screen.
Bear in mind that uninstalling the integration will result in the removal of all Yotpo Review Highlights displayed within your Klaviyo emails.
Was this article helpful?