---
title: "Redeem Points On-site Module (Interactive)"
slug: "redeem-points-on-site-module-interactive"
tags: ["Loyalty and Referrals", "Shopify Plus", "Shopify", "Salesforce Commerce Cloud", "Adobe Commerce (Magento)", "BigCommerce", "Custom"]
updated: 2025-02-05T10:43:08Z
published: 2025-02-05T10:43:08Z
canonical: "support.yotpo.com/redeem-points-on-site-module-interactive"
---
> ## Documentation Index
> Fetch the complete documentation index at: https://support.yotpo.com/llms.txt
> Use this file to discover all available pages before exploring further.
# Redeem Points On-site Module (Interactive)
Products
Loyalty & Referrals
###### Supported plans
Premium, Enterprise
###### eCommerce Platform
Shopify, Shopify Plus, BigCommerce, Salesforce Commerce Cloud, Adobe Commerce (Magento), Custom
The Interactive Redeem Points Module is a highly-customizable way to let customers redeem their points for rewards. You can deploy a new module in minutes, with no development required.
In this article, you'll find out how to access, customize, and deploy the Interactive Redeem Points Module on your site.
Tip
Read more about [which Redeem Points Module & Checkout Modules you need for your program.](/v1/docs/guide-to-the-redeem-points-modules)
## Before you start
Before setting up your Interactive module, you'll want to:
- [Set up rewards](/v1/docs/direct-and-redeemable-coupons-overview)
- **Configure your Loyalty emails** - You will want to notify your customers when they get a coupon code. Read more about configuring [Yotpo Triggered Emails](/v1/docs/customizing-yotpo-loyalty-referrals-triggered-emails) or emails via [ESP integrations](/v1/docs/communications)
## Accessing the editor
**Accessing via the Rewards Page Builder**
To access and edit the section via the [Rewards Page Builder](/v1/docs/getting-started-with-the-rewards-page-builder), do the following:
1. In your Yotpo Loyalty & Referrals main menu, go to **Display On-site >** [**Rewards Page Builder**](https://loyalty-app.yotpo.com/rewards-page-builder-widget).
2. Click **Create Rewards Page** or click the existing page you want to edit.
3. Click **Redeem Points (Free Products** Section).
4. Proceed below to the next step, "Customize settings".
**Accessing as a module**
To access and edit as a [Module](/v1/docs/overview-of-modules-rewards-page-builder-sections), do the following:
1. In your Yotpo Loyalty & Referrals main menu, go to Display On-site > [**Redeem Points Modules**](https://loyalty-app.yotpo.com/redemption-widgets).
2. Scroll down to the "**Interactive**" section.
3. Click **Edit** on the instance you wish to edit or click **"+ Create new"**
Note
Your Module won't appear on your site until you publish it
## Customizing the module
There are three sections in the module editor:
1. Layout
2. General appearance
3. Customize reward appearance
## 1. Layout
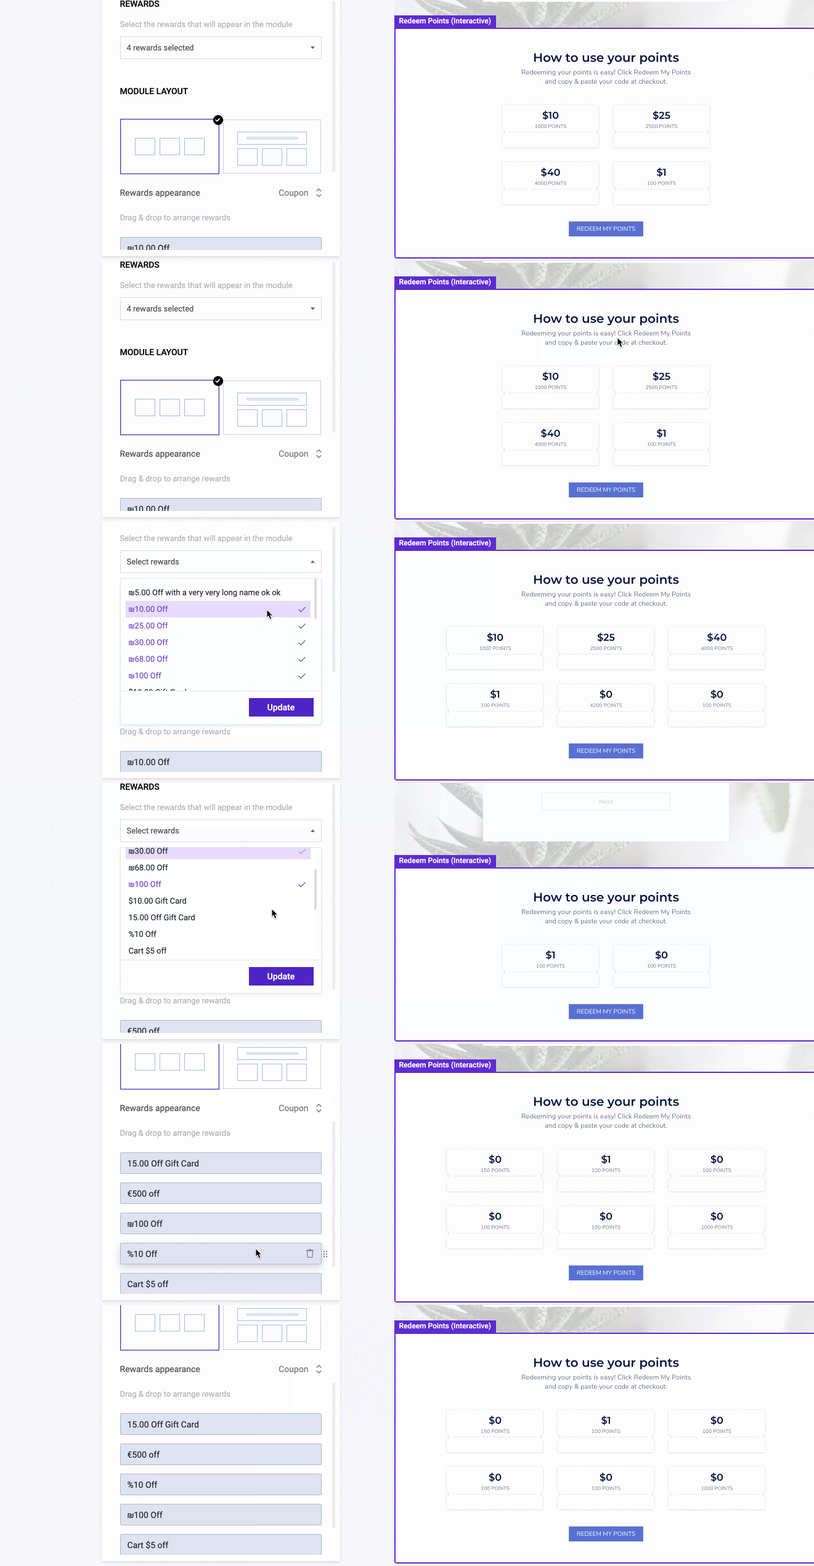
In this section, you can choose which rewards to display, arrange the order in which they appear, and change the layout of your module.
## 2. General appearance
These are the settings that are general to the module. To edit individual rewards, go to [Customize reward appearance](/v1/docs/redeem-points-on-site-module-interactive#3-customize-reward-appearance)
#### General appearance > Fonts & general text
**Background color** Choose whether you want to add a background color or have the widget be transparent.
Fonts
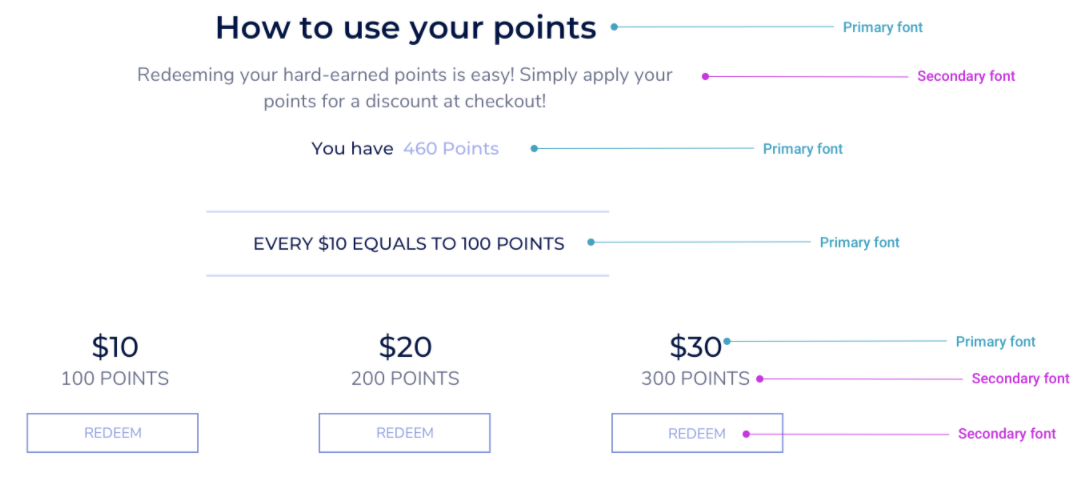
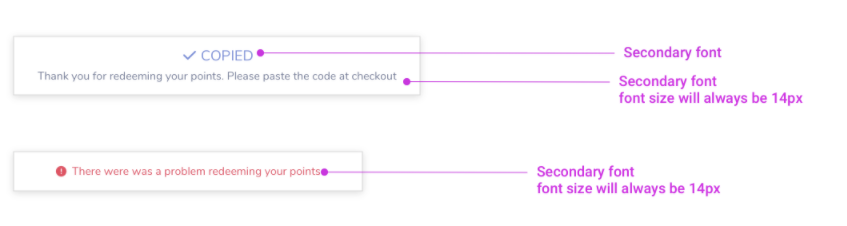
The primary and secondary fonts are two fonts that will apply in several places throughout your module. Click below to see where the fonts appear.
Primary & Secondary Fonts
Discount amount
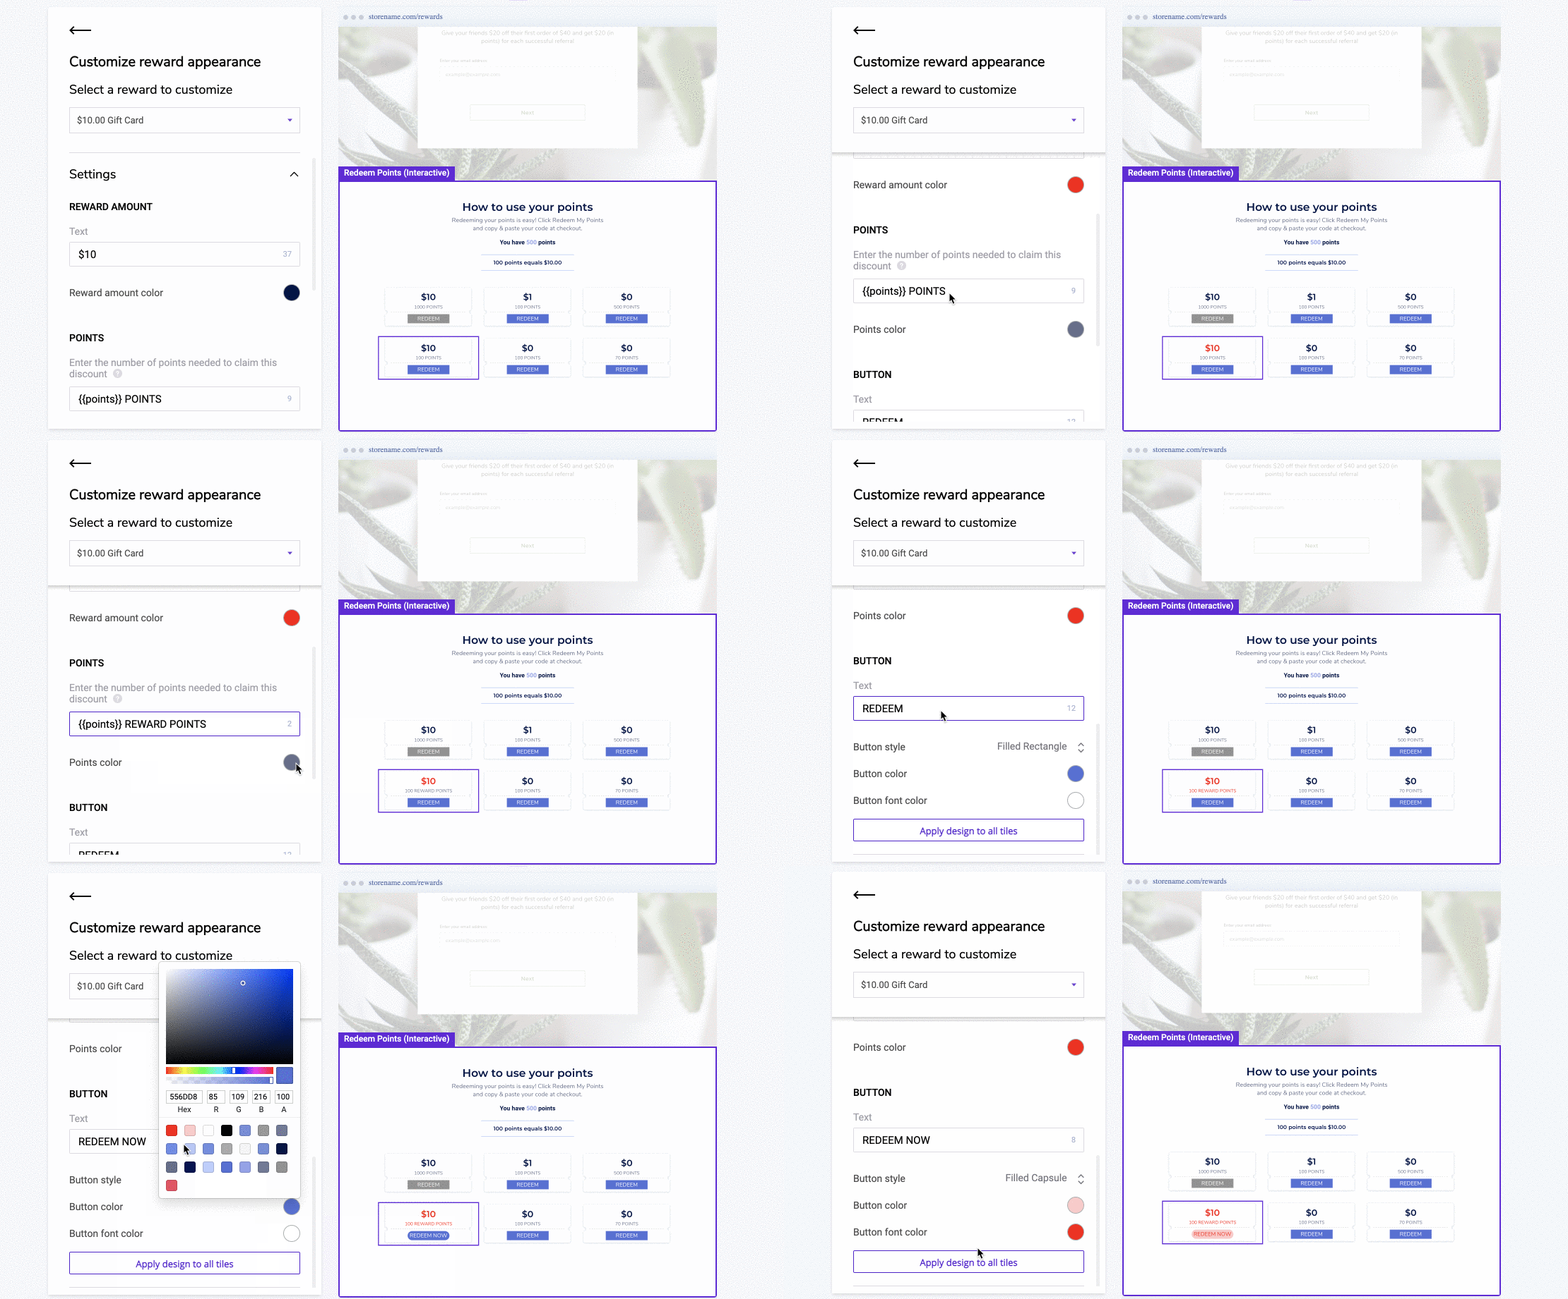
Discount amount (usually in the form of currency, such as $10.00). Changing this will only change how it appears, but will not change the actual value of the reward. To change the value of the reward, do so in the loyalty admin.
Points
This is the number of points needed to claim the discount. The system will auto-populate the number of points you set up in your admin. This field must contain the variable:
{{points}}
#### Apply Design to All Tiles
This is a quick and easy way to apply changes to your tile design. Clicking Apply Design to All Tiles will take the following design settings and apply them across all the tiles:
- Reward amount color
- Points text & color
- Button style, color, and button font color
You may see that your button color stays gray on some of your rewards after you click apply design to all tiles. This is a preview of what it will look like if the customer doesn't have enough points to redeem this reward.
## Publishing the module
For your Module to appear onsite, you need to embed some code onto your site. See a guide for [Embedding Modules on Shopify](/v1/docs/embedding-on-site-modules-on-your-store).
## **Publishing via the Rewards Page Builder**
If you are building your Redeem Points Section with the Rewards Page Builder, follow the [steps for publishing your Rewards page](/v1/docs/getting-started-with-the-rewards-page-builder).
### Active/Inactive
**Active**
If your module is **active** (green dot), this means that any changes you publish will be reflected on your store if the module snippet is embedded
Inactive
If your module is **inactive** (yellow dot), this means that any changes you publish/save will not be reflected on your store. This also means if you had the module snippet embedded and active on your store before, it will not be visible when inactive.
## Advanced customizations
There are some additional customizations that can be made to the module if you are savvy with code. See below the advanced options.
The following attributes can be added to your module's code snippet, just **after your instance ID.**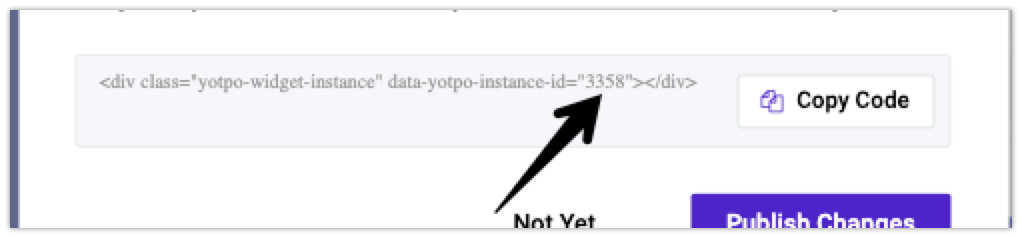
For example, if your module's code snippet looks like this:
**Then add the attribute here:**
If you want to add multiple attributes, add them one after the other, separated by spaces.
Advanced Attributes
- coupons-redemption-headline
="insert your own text here!"
Default - "How to use your points", the text of the headline of the module. - coupons-redemption-description
="insert your own text here!"
Default - "Redeeming your points is easy! Click Redeem My Points and copy & paste your code at checkout.", the text of the description of what the module does. - coupons-redemption-rule
="insert your own text here!"
Default - "100 points equals $10.00", the text of the exchange rate of points to dollars. - redeem-button-text
="insert your own text here!"
Default - "REDEEM", the text of the button to make the redemption coupon - login-button-text
="insert your own text here!"
Default - "REDEEM MY POINTS", the text of the button that takes you to the login page in case the customer is logged out - point-balance-text
="insert your own text here!"
Default - "You have {{current_point_balance}} points", the text that presents the point balance of the customer - coupon-code-copied-message-title
="insert your own text here!"
Default - "COPIED", the text of the message that appears after the coupon code was copied - coupon-code-copied-message-body
="insert your own text here!"
Default - "Thank you for redeeming your points. Please paste the code at checkout.", the text of the message that appears after a redeemed coupon - confirmation-step-title
="insert your own text here!"
Default - "ARE YOU SURE?", the text of the message to confirm the redeem action - confirmation-step-confirm-option
="insert your own text here!"
Default - "YES", the text of the button to confirm the redeem action - confirmation-step-cancel-option
="insert your own text here!"
Default - "NO", the text of the button to reject the redeem action - donate-button-text
="insert your own text here!"
Default - "DONATE", the text of the button to make the donation - donation-success-message-body
="insert your own text here!"
Default - "Thank you for donating {{donation_amount}}$ to {{company_name}}", the text of the message after donation was success - donation-success-message-title
="insert your own text here!"
Default - "SUCCESS", the text of the title after a donation was successful